Welcome to 11 weeks to go in the Hololens Unity3d app contest! If you recall my first post last week then this week is about learning all the technical features in the Hololens. I want to explore all the capabilities so I can then decide what I should use in my app.
Microsoft Mixed Reality Toolkit for Unity
There are several ways to go in developing to the features in Hololens:
- Unity:
Unity has been working to incorporate a generic API that can sit above all the VR and Mixed Reality native SDKs. I think they have done a great job so far of making VR/AR very accessible to Unity developers without needing additional SDKs. That said, their support is always going to be limited compared to custom SDKs and you’ll need to do more work (but you will be in more control) - Hololens Academy code samples:
When Microsoft published the series of tutorials it shared code for doing various things, such as Gaze cursors, Interaction, Spatial Mapping and Understanding. We could follow the tutorials and use that code. - Microsoft Mixed Reality Toolkit for Unity
Back in Feb 2016 Microsoft started to share code for the MR Toolkit for Unity on github. This has grown to be quite comprehensive from what I can tell and seems like the place that most developers are currently using to built Hololens apps.
Of course we can use a combination of those. I have built gaze cursors before for VR, but I also want to stick closely with the expected Hololens behaviour (especially this week as I get started). I’d hate to implement clicking with the built-in Unity gesture system and then find it doesnt support speech recognition or the external clicker. So I will download the Mixed Reality Toolkit and start with that:
Download this repository:
https://github.com/Microsoft/MixedRealityToolkit-Unity
I note in the ProjectSettings/ProjectVersion.txt the Unity version is 2017.1.0f3, which is great since that is what we are using (phew!), so lets open it and start playing.
Hololens Camera
Even though the camera setup is pretty straight forward, it is just a camera statically located in our scene. That doesn’t help us much for any testing in the Unity Editor where we might want to move around.
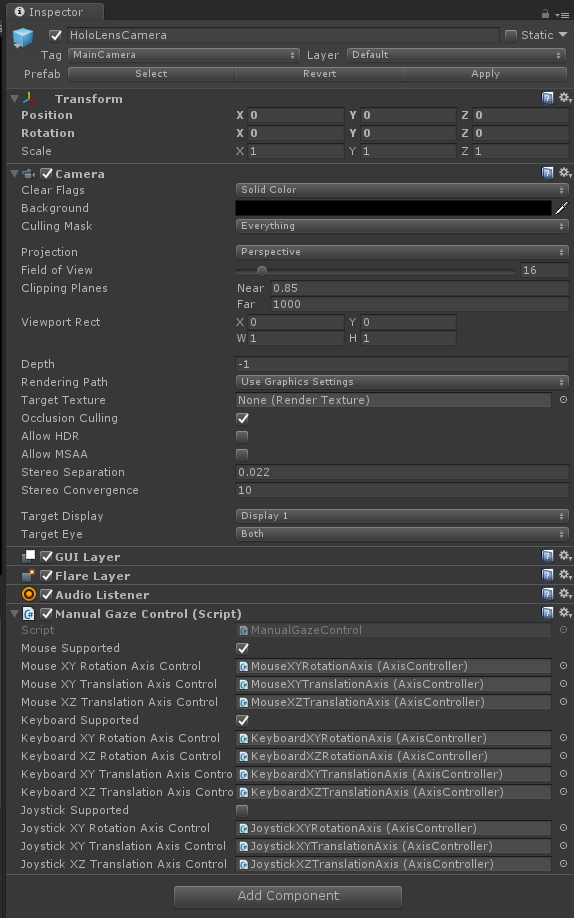
A simple solution to this is using the HoloLensCamera prefab from the MixedRealityToolkit (HoloToolkit/Input/Prefabs/HoloLensCamera), it adds the ManualGazeControl script to the camera and now we can right click on the mouse to rotate the camera in the scene, and use the keyboard to move around.
Very handy for quick testing:
Global Select (tap)
One of the first things I want is a way to tap globally. That is so useful for quickly testing something. I love having Unity Input.GetMouseButtonDown(0) for a quick check of something in the editor, but how can we do that with Hololens. And also support the standard 3 Hololens ways to select something:
- AirTap gesture
- Clicker
- Voice say “select”
The way to do it for all three without any plugins, custom code, or Input Managers is using the UnityEngine.VR.WSA.Input.GestureRecognizer class. The code you need is simply create a GestureRecognizer, enable GestureSettings.Tap’s and assign a delegate to the Tapped event. All of our three methods above will just work:
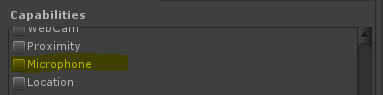
Note: A very interesting thing was I did not need to enable the Microphone option in Project Settings Capabilities for the voice “select” to work. I guess it’s a built in feature for all apps:
One disappointing thing though is you can’t simulate any of those in the Unity Editor (that I could find?). So I’ve added a small bit of code in the Update() method if I see a mouse click in the editor I also call the delegate.
You can take this script, easily make it fire out an external action and use it any where in your scene that requires a global tap. Handy!
Obviously no cursor or feedback to the user if the hand is detectable. You would need some message in the scene to tell the user to tap to continue.
TapToChangeColour.cs:
using System.Collections;
using System.Collections.Generic;
using UnityEngine;
using UnityEngine.VR.WSA.Input;

public class TapToChangeColour : MonoBehaviour {

    GestureRecognizer recognizer;

    void Awake() {
        recognizer = new GestureRecognizer();
        recognizer.SetRecognizableGestures(GestureSettings.Tap);
        recognizer.StartCapturingGestures();
    }

    void OnEnable() {
        recognizer.TappedEvent += Recognizer_TappedEvent;
    }

    void OnDisable() {
        recognizer.TappedEvent -= Recognizer_TappedEvent;
    }

    void Update () {
#if UNITY_EDITOR
        // simulate tap with mouse button
        if (Input.GetMouseButtonDown(0)) {
            Recognizer_TappedEvent(
                InteractionSourceKind.Other,
                1,
                Camera.main.ScreenPointToRay(Input.mousePosition));
        }
#endif
    }

    private void Recognizer_TappedEvent(InteractionSourceKind source, int tapCount, Ray headRay) {
        GetComponent<Renderer>().material.color = Random.ColorHSV();
    }
}
Gaze Select (TAKE 1 – Unity Event System)
Global tap is very useful for quickly testing something out, but it’s a big hammer, I now want something I can use to tap on 3d scene content and UI canvas elements. So lets get basic gaze select working. I don’t want to add a gaze cursor yet, let’s just see how a basic gaze by itself works.
I know the Unity way is to use an Input Module and then provide Physics and Graphic raycasters depending if you want to interact with 3d or canvas UI. I wrote one of the first VR gaze input modules when the Oculus Rift came out, and of course Google VR has one, and Unity has their own built in now too.
So the question is, which is one that will work with Hololens and provide those three standard input cases we just used above (plus the mouse would be nice and handy too).
(3 hours later)
OK, so I’ve done my best to try and utilise the Unity event system – but I have hit a wall – and I can’t get it to work with 3d objects in the scene. What I did was:
(HOPEFUL START DOWN THE ROAD…)
- Add an event system into the scene
- Add a HoloLensInputModule to it (which also adds a HoloLensInput component)
- Add a script to our cube that supports events:
public class GazeTapToChangeColour : MonoBehaviour, ISelectHandler, IPointerClickHandler, IPointerEnterHandler, IPointerExitHandler {
public void OnPointerClick(PointerEventData eventData) { GetComponent<Renderer>().material.color = Random.ColorHSV(); }
public void OnPointerEnter(PointerEventData eventData) { transform.localScale *= 1.2f; }
public void OnPointerExit(PointerEventData eventData) { transform.localScale /= 1.2f; }
} - Add a physics raycaster to our Hololens camera
- Add a UI Button into the scene
- Set the canvas to world space (scale and positionit so the button is visible near our cube)
- Add a GraphicRaycaster to the canvas object
- Edit our cube script above to add a colour change method:
public void ChangeColour() { GetComponent<Renderer>().material.color = Random.ColorHSV(); } - And hook up the canvas button click event to call that method
Now run in the editor, and you can see when the mouse is over the cube is expands, and clicking on it changes colour. Clicking on the button also changes colour.
BUT, when you run this in the actual Hololens, everything EXCEPT the tap on the 3d object works. We can tap canvas UI, but we can’t tap on the 3d cube.
(REACHED DEAD END)
Now, I could write my own input handler, but then it probably won’t work with advanced Hololens gestures and input, so I’m not going to do that now. Instead, lets look at what Microsoft provides in the Mixed Reality Toolkit…
Gaze Select (TAKE 2 – HoloToolkit Input)
The HoloToolkit comes with an Input Manager that will enable us to interact with objects in the scene. The objects just need to have a collider to raycast against (just like the normal Unity input modules but we don’t need a Physics Raycaster).
There is a prefab supplied in the toolkit which has not only the input manager, but some additional features, such as being able to test input in the Unity Editor (which is what I was looking for).
So, lets get started with a new Unity scene and delete the main camera.
- Drag in the HoloLensCamera prefab (as we said above it sets it up for us and gives us the ability in the editor to rotate and move around with mouse and keyboard)
- Drag in the InputManager prefab (by default this gives us gaze events without a cursor), and we can implement input manager interfaces to handle click, focus, and more.
- Drag in the DefaultCursor prefab (this gives us a 3d animated cursor that imitates the Hololens shell cursor – it’s a dot that changes to a circle when fingers are tracked, and the cursor snaps just above and perpendicular to the objects surface)
- Now create a 3d cube in the scene (2m in front of the user, and scale it to (.1, .1, .1).
Add this script to the cube so we can see if events are being handled:
HoloTapToChangeColour.cs:
using System.Collections;
using System.Collections.Generic;
using UnityEngine;
using HoloToolkit.Unity.InputModule;

public class HoloTapToChangeColour : MonoBehaviour, IInputClickHandler, IFocusable {

    public void OnInputClicked(InputClickedEventData eventData) {
        GetComponent<Renderer>().material.color = Random.ColorHSV();
    }

    public void OnFocusEnter() {
        transform.localScale *= 1.2f;
    }
    public void OnFocusExit() {
        transform.localScale /= 1.2f;
    }

}
And run in the editor, you will see test hands. Press LEFT SHIFT or SPACE keys to enable the left or right hand respectively. You can still rotate around the view with right click and mouse. But now we can also left click to perform an AirTap gesture with our activated hand.
If you center the gaze cursor on the cube and AirTap you will see it responds to the event and changes colour.
Also when you move the cursor on and off the cube you will see it changes size.
As the Hololens toolkit can’t interact with Canvas UI, they have supplied a range of buttons, sliders, checkboxes, etc in the examples folder that can be used in world-space.
Run this up on the actual Hololens and I can confirm we can AirTap, Clicker click and say the voice command “select” !
Awesome we now have the basic ability to interact with 3d objects.
Global Tap (Again – but now with HoloToolkit Input)
My global tap above is very useful for quickly trying something out, but it would be nice to have a global tap that works along with the HoloToolkit gaze input we just used. Why? Because I want to be able to get a global tap if the user is not currently focused on a game object (who will also get a click).
Luckily for me, the HoloToolkit Input Manager supports globally listening to taps (without having to be the gameobject currently focused).
I created the following script to receive a tap if a game object isn’t focused on (or also if that game object belongs to a layer that we want to ignore – useful if I also want to get clicks at the same time a gameobject does)
using System.Collections;
using System.Collections.Generic;
using UnityEngine;
using UnityEngine.Events;
using HoloToolkit.Unity.InputModule;

public class GlobalSelect : MonoBehaviour, IInputClickHandler {

    [Tooltip("Fire a global if focused game object is not one of these")]
    public LayerMask ignoreLayers = 0/*nothing*/;
    [Tooltip("The event fired on a Holo tap.")]
    public UnityEvent Tap;

    private void Start() {
        Debug.Log(ignoreLayers.value);
    }

    void OnEnable() {
        InputManager.Instance.AddGlobalListener(gameObject);
    }

    void OnDisable() {
        InputManager.Instance.RemoveGlobalListener(gameObject);
    }

    public void OnInputClicked(InputClickedEventData eventData) {
        // get the currently focused game object (if there is one)
        GameObject focusedObject = (InputManager.Instance.OverrideFocusedObject == null) ? GazeManager.Instance.HitObject : InputManager.Instance.OverrideFocusedObject;

        // a tap is if there is not game object focused, or if that game object is in the layer mask
        if (focusedObject == null || (ignoreLayers.value != 0 && focusedObject.layer != 0 && ((1 << focusedObject.layer) & ignoreLayers.value) != 0)) {
            Tap.Invoke();
        }
    }


}
Lets create an empty game object in our scene, and add this script, plus another script with a void OnTap() method and then assign that method to the GlobalSelect Tap event.
Now, when we run the app, and perform the select while not looking at a game object we see that event fires. Useful!
Hand Tracking
So we see above how to do Gaze tracking, and that gaze tends to be used widely in Hololens. But to quote Bill Buxton “Everything is best for something and worst for something else.” there are some alternatives, and one if using hand tracking, which may be more natural for dragging and moving objects, and obviously drawing in the air.
Hololens has support for hand tracking and this is exposed in Unity with the InteractionManager module.
HandTracking supports hand detection, hand tracking, and the same select gesture as the AirTap above (but not as a triggered event, rather a mode that is on or off). The Hololens uses this for of tracking to let you select something and move it around.
The Unity implementation is actually quite straightforward, you can register with the InteractionManager to know when the hand is in view and being tracked. And then while it is being tracked it will let you query the position in 3d world around you where the hand is.
Note: You might be expecting this is actually doing finger tracking (as you need an extended finger from your hand for the detection to take place), but the position it gives you is the center of the palm. I think this is because they knew they wanted to use the finger to perform the grip action and this could make it more difficult to give you a reliable finger tip position.
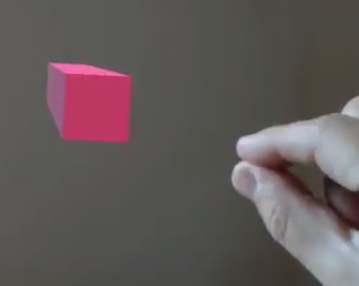
You can see in the video below, I have placed a yellow sphere at the location the InteractionManager reports as the position. When the select gesture triggers on I change the colour to red.
To create the above, I created a new scene, deleted the MainCamera and added the HololensCamera prefab.
Because I will put a sphere where my hand actually is, it will likely be closer then the default camera near clipping plane of 0.85m, so I changed the clipping plane to be 0.1m.
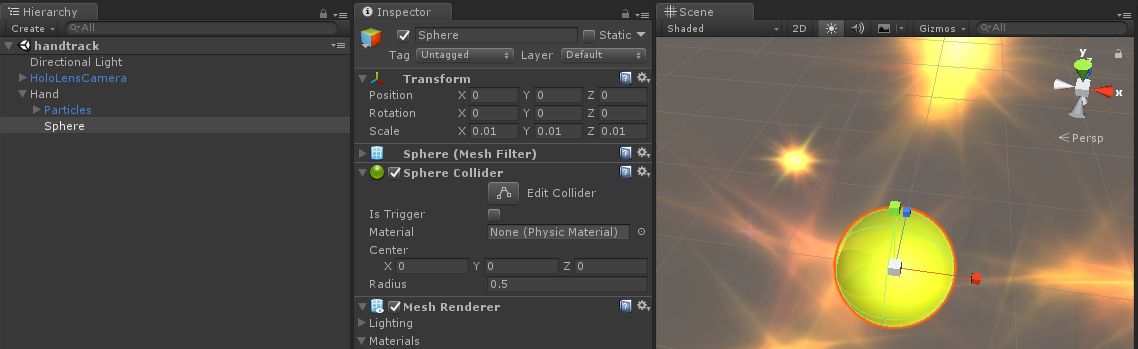
Next I created an empty game object to be the hand we will move around, and I added a sphere as a child (scaled to 1cm). I also threw in some particles too.
Now, I added this script to track the hand, and move my Hand game object’s position:
using System.Collections;
using System.Collections.Generic;
using UnityEngine;
using UnityEngine.VR.WSA.Input;

public class TrackHand : MonoBehaviour {

        public GameObject hand;
    bool isPressed = false;

    // Use this for initialization
    void Start () {

        // Hand Tracking
        InteractionManager.SourceDetected += InteractionManager_SourceDetected;
        InteractionManager.SourceLost += InteractionManager_SourceLost;
        InteractionManager.SourceUpdated += InteractionManager_SourceUpdated;

        // Pressing
        InteractionManager.SourcePressed += InteractionManager_SourcePressed;
        InteractionManager.SourceReleased += InteractionManager_SourceReleased;
    }

    private void InteractionManager_SourceDetected(InteractionSourceState state) {
        Debug.Log("InteractionManager_SourceDetected");
        hand.SetActive(true);
    }

    private void InteractionManager_SourceLost(InteractionSourceState state) {
        Debug.Log("InteractionManager_SourceLost");
        if (isPressed) {
            isPressed = false;
            OnSelect(false);
        }
        hand.SetActive(false);
    }

    private void InteractionManager_SourceUpdated(InteractionSourceState state) {
        Debug.Log("InteractionManager_SourceUpdated");
        Vector3 position;
        if (state.properties.location.TryGetPosition(out position)) {
            hand.transform.position = position;
        }
    }

    private void InteractionManager_SourcePressed(InteractionSourceState state) {
        isPressed = true;
        OnSelect(true);
    }

    private void InteractionManager_SourceReleased(InteractionSourceState state) {
        isPressed = false;
        OnSelect(false);
    }


    public Renderer handRenderer;

    void OnSelect (bool selecting) {
        handRenderer.material.color = selecting ? Color.red : Color.yellow;
    }
}
Note: The hand tracking could be lost while the user is performing the press, so if we detect tracking is lost and we’re currently in a press, then we also release.
World Anchors (or how to keep content in the same real-world place)
I do feel sorry for Microsoft (and other AR vendors – hello Meta). You would think it would be enough to invent some Augmented Reality glasses (with see through stereoscopic displays and accurate world-scale tracking) to view holographic content in our spaces and even interact with it. But like Thomas Edision and the electric light, it’s not enough to invent something in isolation you have to bring it to the masses, so he had to invent and deploy electric power distribution. In a similar way Microsoft had to create a bunch of extra technology in the Hololens system to make it practical (and appealing) to us…
Which brings us to anchoring, or how can we keep our content in the exact same location and orientation when we quit the app, reboot the Hololens, or whatever, when we come back to our app, we want everything where we left it. Just like we discovered in Part 2 (-12 weeks): HolloWorld – App Lifecycle & World space tracking, when the Hololens launches an app for the first time it sets that as the world origin. So that origin will change depending if your app is launched from a different location and whether the app is a fresh launch or simply a re-activation.
We can see the behaviour in the shell with the built-in Holograms app. It’s typically the first app anyone with a Hololens runs, placing holograms around your space, and then it’s a nice feeling the next time you use Hololens to find all the holograms exactly where you left them.
So how does this work?
World Anchors and the World Anchor Store
Hololens is continuously tracking our spaces and mapping them, and is is storing this map for later reference. With this world map, it allows us to anchor content into that map, so even in our own apps (which has it’s own local space as we’ve seen) we can map our local space content into the world-space map the shell has. Unity has support built-in for us to create and manage anchors and assign them to our game objects. These anchors are stored in the World Anchor Store, .
Unity’s built in implementation has the store where you can load or save anchors into it by name (an identifier string unique to our app).
To create an anchor you attach a WorldAnchor component to your game object (if you called load it adds it to your gameobject automatically).
Once your game object has a WorldAnchor then you have relinquished control of the transform. The transform is now updated by the Hololens. Once the Hololens can determine where in the real world that anchor is, the anchor property isLocated will be true. As Hololens is continuously updating it’s map, it’s not unusual now for that gameobject to move around as Hololens aquires an improved understanding of your location. Now if isLocated is false it means Hololens can’t currently determine where that anchor is, so you can register for OnTrackingChanged events to handle the tracking changing.
For a good overview of how to save and load holograms at the correct world location, see this Unity documentation:
https://developer.microsoft.com/en-us/windows/mixed-reality/persistence_in_unity
OK, so lets start with a basic Hololens app that lets you place cubes around you and then’we’ll add anchoring for each cube.
Unanchored Cubes Demo
Create a new scene: WorldCube
Delete the MainCamera, and drag in a HololensCamera prefab.
Lets create a cube (or any 3d object) we’ll spawn. In the scene, right click and create 3d cube. Create a material to give it a colour or texture. Then drag the cube into the project to get a prefab. And delete the cube from the scene.
For spawning, lets do our usual trick and put an anchor game object directly 2m in front of the camera (as a child so it stays there), and then use these 2 scripts to spawn any prefab.
HoloTap.cs:
using System.Collections;
using System.Collections.Generic;
using UnityEngine;
using UnityEngine.VR.WSA.Input;
using UnityEngine.Events;

public class HoloTap : MonoBehaviour {

    [Tooltip("The event fired on a Holo tap.")]
    public UnityEvent Tap;

    GestureRecognizer recognizer;

    void Awake() {
        recognizer = new GestureRecognizer();
        recognizer.SetRecognizableGestures(GestureSettings.Tap);
        recognizer.StartCapturingGestures();
    }

    void OnEnable() {
        recognizer.TappedEvent += Recognizer_TappedEvent;
    }

    void OnDisable() {
        recognizer.TappedEvent -= Recognizer_TappedEvent;
    }

    void Update () {
#if UNITY_EDITOR
        // simulate tap with mouse button
        if (Input.GetMouseButtonDown(0)) {
            Recognizer_TappedEvent(
                InteractionSourceKind.Other,
                1,
                Camera.main.ScreenPointToRay(Input.mousePosition));
        }
#endif
    }

    private void Recognizer_TappedEvent(InteractionSourceKind source, int tapCount, Ray headRay) {
        Tap.Invoke();
    }
}
and a component to spawn us game objects at a location.
Spawner.cs:
using System.Collections;
using System.Collections.Generic;
using UnityEngine;

public class Spawner : MonoBehaviour {

    public GameObject SomethingToSpawn;
    public Transform SomewhereToSpawn;
    public Transform SomeParentToSpawnUnder;
    public Transform SomewhereToLookAt;
    public bool KeepLevelWithGround = true;

    public void SpawnNew() {
        Spawn();
    }

    public GameObject Spawn () {
        GameObject go = GameObject.Instantiate(SomethingToSpawn, SomewhereToSpawn.position, SomewhereToSpawn.rotation, SomeParentToSpawnUnder);
        if (go) {
            if (SomewhereToLookAt != null) {
                go.transform.LookAt(SomewhereToLookAt.position);
            }
            if (KeepLevelWithGround) {
                go.transform.eulerAngles = new Vector3(0, go.transform.eulerAngles.y, 0);
            }
        }
        return go;
    }
}
Add a gameobject in front of the camera for where we want the spawner to place it

Note in the spawner I made a KeepLevelWithGround property to keep the cube level with the ground. We can do that because Hololens guarantees us that the Unity axis space will have a level ground plane (another one of the extra features Microsoft had to add it to make AR usable!).
Set the tap event of the HoloTap to call SpawnNew() above.
And for a sanity check, run that and make sure your cube spawns:

Cool!
Anchored Cubes Demo
Now lets add to our scenario above the ability for those cubes we create to be anchored in the world so next time we launch the app all the cubes are exactly positioned and orientated where we left them.
First, we’ll use the WorldAnchorStore to load all our existing anchors (which we’ll create next). Anchors are basically named objects in the anchor store. The name is a string and so can be anything, but like a filename, needs to be unique.
Here’s a script to spawn a cube for every saved anchor in our store:
LoadWorld.cs:
using System.Collections;
using System.Collections.Generic;
using UnityEngine;
using UnityEngine.VR.WSA.Persistence;
using UnityEngine.VR.WSA;

public class LoadWorld : MonoBehaviour {

    WorldAnchorStore anchorStore;
    public Spawner spawner;

    // Use this for initialization
    void Start() {
        WorldAnchorStore.GetAsync(StoreLoaded);
    }

    private void StoreLoaded(WorldAnchorStore store) {
        anchorStore = store;

        // Spawn each object in our store (the object will lookup the store to position itself)
        string[] ids = anchorStore.GetAllIds();
        for (int index = 0; index < ids.Length; index++) {

            // Instantiate the cube
            GameObject go = spawner.Spawn();
            Debug.Log("Spawning into the world:" + ids[index]);
            PersistWorldAnchor pwa = go.GetComponent<PersistWorldAnchor>();
            pwa.worldAnchorStoreId = ids[index];
        }
    }

}
So here we re-use our spawner to spawn our cube (in front of the user), but we also are going to add a new component onto the cube called PersistWorldAnchor which will be responsible for using this new property worldAnchorStoreId to locate the record in the store (if there is one) and then attach that WorldAnchor to our cube. Doing this will move the cube to the correct position and orientation.
using System.Collections;
using System.Collections.Generic;
using UnityEngine;
using UnityEngine.VR.WSA.Persistence;
using UnityEngine.VR.WSA;

public class PersistWorldAnchor : MonoBehaviour {

    public string worldAnchorStoreId;

    WorldAnchorStore anchorStore;


    // Use this for initialization
    void Start() {

        if (string.IsNullOrEmpty(worldAnchorStoreId)) {
            worldAnchorStoreId = System.Guid.NewGuid().ToString();
            Debug.Log("New Cube: Name will be;" + worldAnchorStoreId);
        }

        WorldAnchorStore.GetAsync(StoreLoaded);
    }

    private void AttachingAnchor_OnTrackingChanged(WorldAnchor self, bool located) {
        if (located) {
            Debug.Log("AttachingAnchor_OnTrackingChanged Saving persisted position in callback:" + worldAnchorStoreId);
            bool saved = anchorStore.Save(worldAnchorStoreId, self);
            Debug.Log("saved: " + saved);
            self.OnTrackingChanged -= AttachingAnchor_OnTrackingChanged;
        }
    }

    private void StoreLoaded(WorldAnchorStore store) {
        anchorStore = store;

        // loop through all the anchors and instantiate them
        bool found = false;
        string[] ids = anchorStore.GetAllIds();
        for (int index = 0; index < ids.Length; index++) {

            Debug.Log(ids[index]);
            if (ids[index] == worldAnchorStoreId) {
                Debug.Log("Found ourselves in store so reloading anchor: " + ids[index]);

                WorldAnchor wa = anchorStore.Load(ids[index], gameObject);
                found = true;
                break;
            }
        }

        if (found == false) {

            // Save the game object where it is generated
            WorldAnchor attachingAnchor = gameObject.AddComponent<WorldAnchor>();
            if (attachingAnchor.isLocated) {
                // system knows where it is so save it
                Debug.Log("Saving persisted position immediately");
                bool saved = anchorStore.Save(worldAnchorStoreId, attachingAnchor);
                Debug.Log("saved: " + saved);
            } else {
                Debug.Log("Wating for world anchor");
                attachingAnchor.OnTrackingChanged += AttachingAnchor_OnTrackingChanged;
            }
        }
    }

}
What’s happening is in our Start() method we’re going to assign a new random (unique) id to our cube if it hasn’t got one. It won’t have one the first time a user spawns one as it is not yet tracked with an anchor.
We also register to access the World Anchor Store (which loads asynchronously after a frame or 2).
Once our store is available, we check if our cube’s Id is in the store, and if it is we load the anchor from the store (which attachs it to our cube, and we lose control of the transform). Now the cube may or may not be located in the correct position depending if Hololens can determine our location accurately. Either way the cube will be put somewhere.
In the case where its not in the store, we want to add an anchor and remember its location. But, be careful here, we only want to do that is the anchor is being .isLocated with an accurate location. So we check it is it located correctly, and then we save it. If it isn’t being located yet, we’ll register for the callback to determine when it is located and save it then. (We can get away with this because due to our local room map, the cube’s position will be locally accurate and then can be mapped to the world space).
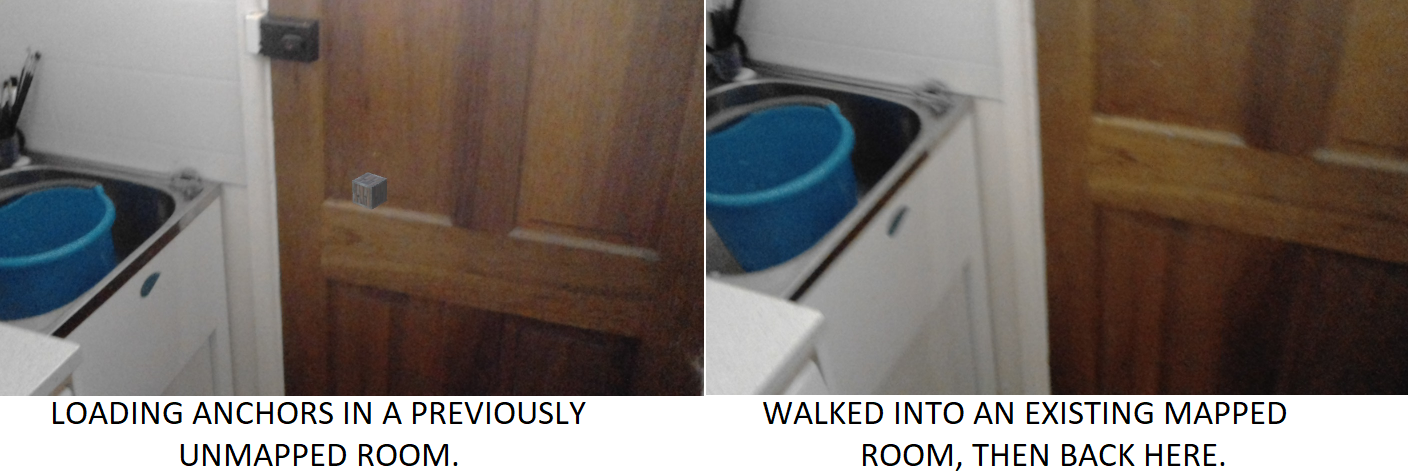
Loading anchors that can’t be initially located
I was left wondering, can we verify that Hololens will in face move our anchored content (transforms) at runtime. To verify it, what I did was run the app above and put a few cubes in my room. Then I quit the app (removed the pinned application window). Turned off Hololens and went to a new room that I have never used Hololens in. I turned on Hololens and loaded the app. The anchors were in the store and the cubes loaded. So now I could see my cubes but I knew they were not in the correct location.
Then I walked out of that room and into a previously mapped room, and like magic the cubes appeared back where I had saved them! I walked back into that first room and as you’d expect they were no longer there.
This is a powerful feature of Hololens!
September 25, 2017 at 11:08 pm
Hey! I’ve tried out the Unanchored Cubes Demo but found a problem. I put both Spawner and Holo Tap scripts onto anchor object (it is child to the Camera object at (0,0,2)), dragged Cube onto Something to spawn attribute and Anchor in all the other attributes. When I play the app, whenever I tap, the Cubes spawn in the same place and follow my gaze instead of spawning 2 units in front of me but wherever my gaze currently is. Do you have any advice?