
So much for trying to deep dive into the Hololens in a single week. Here we are another week on and we haven’t even started looking at one of the most important features of Hololens – the ability to understand the space around us, detecting surfaces, understanding walls, ceiling and the floor, and also being able to use this information to collude holograms.
If you are starting out like me, the whole area of Spatial Understanding in Hololens seems pretty daunting. The Academy tutorials seem to jump right in the deep end.
So I’m going to try and move in baby steps.
Unity’s built in Spatial Mapping (Rendering)
First, I would love to see what the Hololens is seeing around us. Like we could with the Kinect camera – basically a point cloud or mesh of depth information.
Fortunately for me, Hololens has this ability natively in Unity3d with the Spatial Mapping Renderer and a detailed overview of it here.
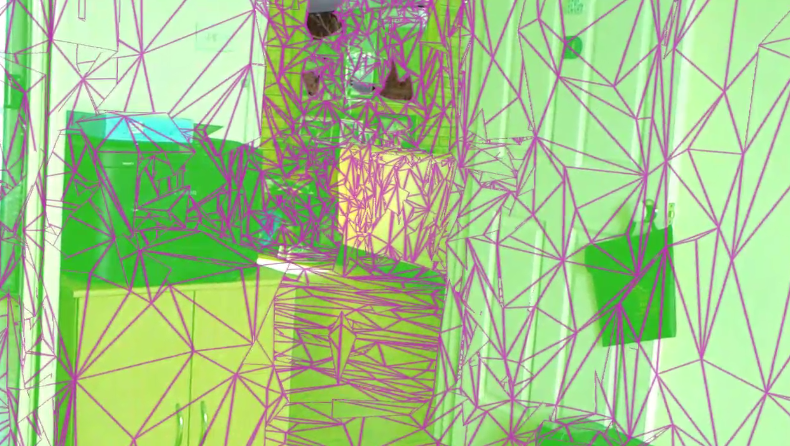
The spatial mapping renderer is a single component you can add into your scene and turn on visualsations to see this:
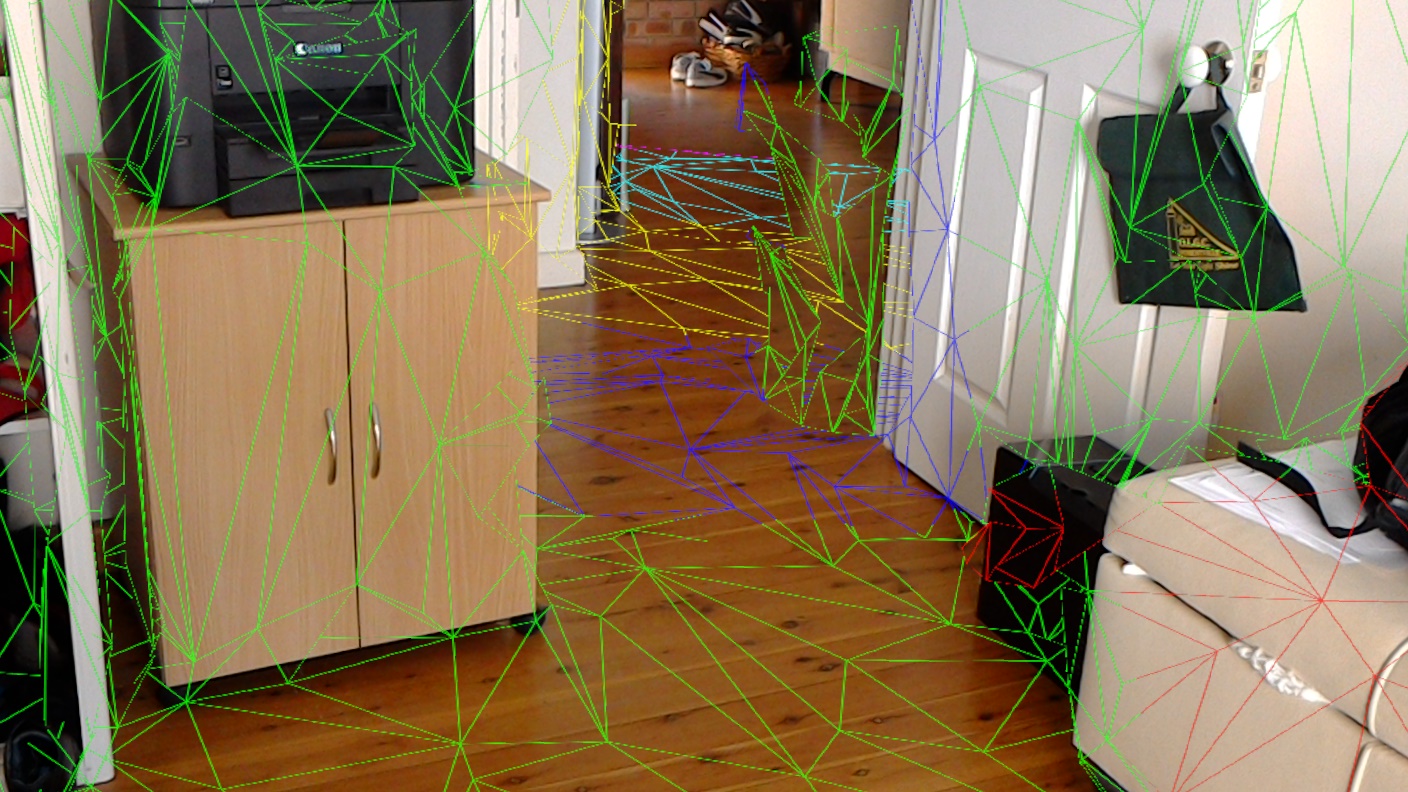
Each colored triangle represents a different distance from the viewer.
To see this, I did:
- Created a new scene
- Delete the MainCamera, and replace it with the HoloLensCamera prefab from the MixedRealityToolkit.
- Added an empty game object to the scene (at 0,0,0) and named it “Spatial Mapping”
- Then add the component “Spatial Mapping Renderer” to it.
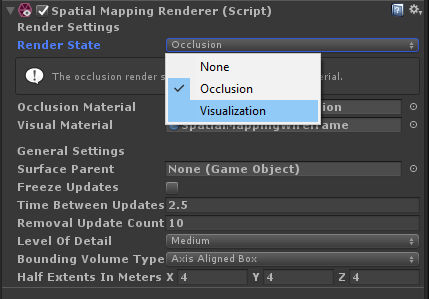
- And change the Render State from Occlusion to Visualization:
- I also added in the ability to instantiate cubes so I could see them in my scene above.
Now, when in Visualization mode it will both occlude and show the triangles. See this video where I have a cube occluded behind a door frame:
The interesting thing here though is the mesh is constantly being re-created (every 2.5 seconds), so that cube above is sometimes occluded and sometimes not as Hololens tries to detect surfaces.
I was monitoring count of surface mesh game objects in my scene during the video, and it peaks at about 61 game objects holding the meshes (I didn’t look into the mesh to count vertices).
The fact is with this mesh there are lots of holes and lots of incorrect meshes floating around in space. So from what it is it doesn’t give you the cleanest mesh to work with but it certainly is giving a reasonable return on investment (since all we had to do was add one component!).
The Spatial Mapping Renderer by default is constantly scanning, so you would do this when the app starts up, but then you might want to stop and keep the mesh static. For this use the freezeUpdates property and set it to false to stop the mesh changing.
Unity’s built in Spatial Mapping (Collider)
OK, so as awesome as that is, it’s just a view into the meshes that Hololens is creating for us about the space around us. It would be a good next step to raycast against it, so we could position our content on the floor or against the wall.
Well the great news is that there is a corresponding Spatial Mapping component which creates the same mesh as above, but as colliders! Of course it’s called the SpatialMappingCollider !
If we add one of those to our scene, and assign it a layer mask (I named mine “Spatial Mesh”) then it will create game objects with that layer in our scene, and we can raycast it using the standard Physics.Raycast().
Lets create a demo where we can spawn content into the world and then move it around against whichever surface we are gazing at. If there is no surface there (eg: a whole in the mesh, or no mesh generated yet), we’ll nicely just move the content back 2m in front of the user).
- Lets create a new Scene.
- Delete the main camera, and replace it with a HoloLensCamera prefab (adjust the near clipping plane to .1 so can get a little closer to our content)
- Lets use the MixedRealityToolkit gaze system, so drag in both the InputManager prefab and the DefaultCursor prefab.
- To enable Spatial Mapping, create an empty game object at (0,0,0) and name it “Spatial Mapping”.
- Add the SpatialMappingRenderer to it, and set the RenderState to Visualization.
- Set the Level Of Detail to Low (that’s faster)
- Add the SpatialMappingCollider to it also
- Under MeshLayer, add a new layer (I used slot 10) and name it “Spatial Mesh””
- Add the SpatialMappingRenderer to it, and set the RenderState to Visualization.
Sanity Test: Build and run that now. You will see the mesh visualize around you as above, but this time with the gaze cursor, you’ll see the cursor is correctly locating just in front of whatever mesh triangle you are looking at. How good is that?
Next, lets add content we can move around.
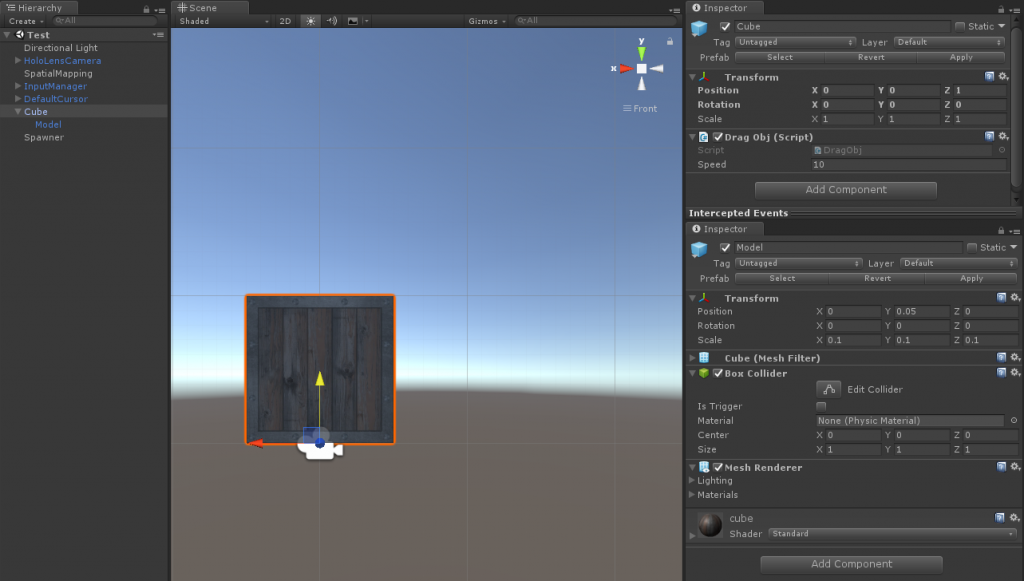
- Create an empty game object in the scene to become our content (for now, move it to (0,0,1) so it’s 1m in front of the app launch position – or right in front of the user)
- I’m going to use a cube, so under it I created a 3d cube as it’s child, and scaled it down to (0.1,0.1,0.1). Now I want the bottom of the cube to be at the bottom of it’s parent game object – so if I position the parent on the floor I want the bottom of the cube resting on the floor. So to do this, I just set the position Y to 0.05 of the cube to lift it up. It looks like this:
- Now, I created a script to put on the cube which allows me to tap on a object to put it in “placing” mode where it will follow my gaze, but if I am looking at the mesh it will move to that point, otherwise it will move back 2m in front of me. Add the script below to your content:

DragObj.cs:
using System.Collections;
using System.Collections.Generic;
using UnityEngine;
using HoloToolkit.Unity.InputModule;

public class DragObj : MonoBehaviour, IInputClickHandler {

    public float speed = 10f;
    bool placing = false;

    void Update() {
        if (placing) {
            Vector3 targetPosition;
            RaycastHit hit;
            if (Physics.Raycast(Camera.main.transform.position, Camera.main.transform.forward, out hit, 10, 1 << LayerMask.NameToLayer("Spatial Mesh"))) {
                targetPosition = hit.point;
            } else {
                targetPosition = Camera.main.transform.position + (Camera.main.transform.forward * 2f);
            }

            // face camera
            Quaternion newRot = Camera.main.transform.rotation;
            newRot.x = 0;
            newRot.z = 0;
            transform.rotation = newRot;

            // and move towards the target position
            float step = speed * Time.deltaTime;
            transform.position = Vector3.MoveTowards(transform.position, targetPosition, step);
        }
    }


    public void OnInputClicked(InputClickedEventData eventData) {
        placing = !placing;
    }
}
Sanity Test: Now run again, and you should see your cube (or whatever you created). Then select on it and it will then follow your gaze around. Select on it again and it will stay put.
Now, lets make it so we can spawn objects too.
Since we’re using the Input Manager, let’s use our GlobalSelect script we created last week so we can get a tap event if the user is not gazing at anything else:
using System.Collections;
using System.Collections.Generic;
using UnityEngine;
using UnityEngine.Events;
using HoloToolkit.Unity.InputModule;

public class GlobalSelect : MonoBehaviour, IInputClickHandler {

    [Tooltip("Fire a global if focused game object is not one of these")]
    public LayerMask ignoreLayers = 0/*nothing*/;
    [Tooltip("The event fired on a Holo tap.")]
    public UnityEvent Tap;

    private void Start() {
        Debug.Log(ignoreLayers.value);
    }

    void OnEnable() {
        InputManager.Instance.AddGlobalListener(gameObject);
    }

    void OnDisable() {
        InputManager.Instance.RemoveGlobalListener(gameObject);
    }

    public void OnInputClicked(InputClickedEventData eventData) {
        // get the currently focused game object (if there is one)
        GameObject focusedObject = (InputManager.Instance.OverrideFocusedObject == null) ? GazeManager.Instance.HitObject : InputManager.Instance.OverrideFocusedObject;

        // a tap is if there is not game object focused, or if that game object is in the layer mask
        if (focusedObject == null || (ignoreLayers.value != 0 && focusedObject.layer != 0 && ((1 << focusedObject.layer) & ignoreLayers.value) != 0)) {
            Tap.Invoke();
        }
    }


}
Add that script to the scene, say on a new empty game object. Set the layer mask to ignore to “Spatial Mesh” so our global tap will only fire if the user is looking at nothing OR looking at the spatial mesh when they tap.
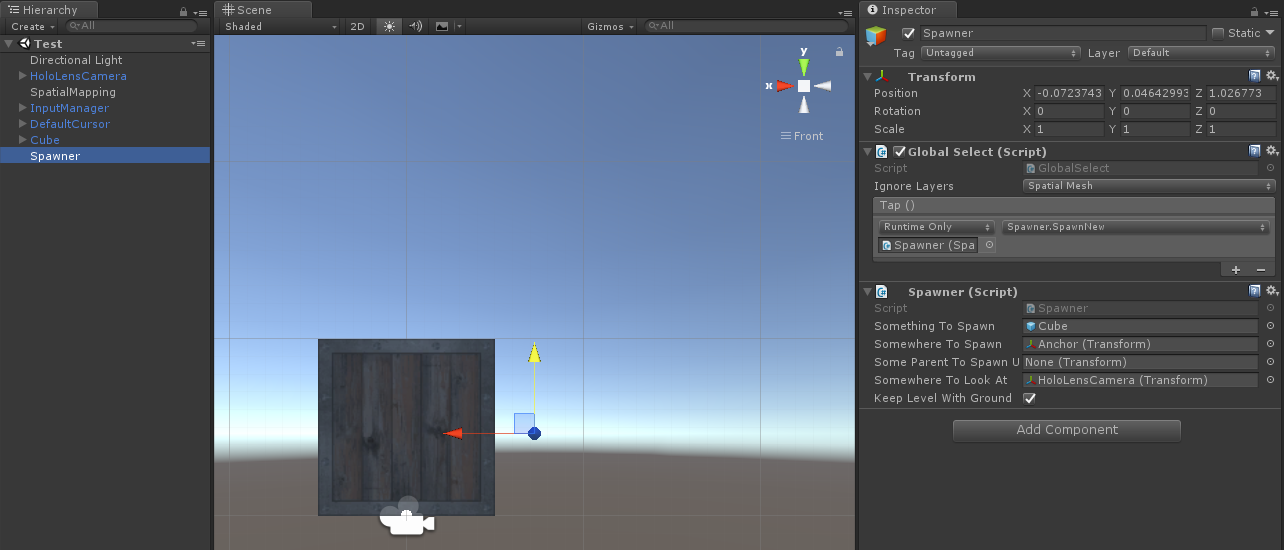
Let’s also re-use our Spawner script from last week too, put it on the same game object, and set the tap event from the GlobalSelect to trigger the SpawnNew() function on this component.
Set the spawner to spawn our cube above. The place we want to spawn it is in front of the user, so also add a anchor gameobject 2m in front of the user (as a child of the HoloLensCamera) and assign that in Spawner.
It will look like this:
Now, run again, and now when you are not looking at a cube and perform a select you’ll get a new cube in space. You can then select it to move it around.
Here’s what the final demo looks like:
I did choose to bring the cube back in front of me 2m, but I could have decided to keep it the same distance away as when we lost the spatial mesh. That’s what the built in Hologram app seems to be doing. Well, also from playing with it, it tends to rotate the content so it faces perpendicular from whatever surface you are gazing at, which makes sense because then you can move it away from being inside the wall more easily (which you can tell in my video I don’t do).
Mixed Reality Toolkit Spatial Mapping Prefab
So that’s great how we can map our space with colliders and see the mesh.
But, the next thing is I notice that the Mixed Reality Toolkit also includes a SpatialMapping prefab. What does that do? In comparison to what we’ve just seen?
First, lets see what this looks like in the HoloLens. I disabled my Spatial Mapping game object which we just made (with the Spatial Mapping Renderer and Collider) and dragged in the Mixed Reality Toolkit Spatial Mapping prefab.
On that Wireframe Surface Material I just changed the colour from white to purple. Ran it on my Hololens and this is what I see:
You can’t tell from that wireframe if the surface mesh is very solid or not, so edit the surface material to set a non-black (non see though) base colour in the material, here I set green:
Now here’s what the prefab looks like: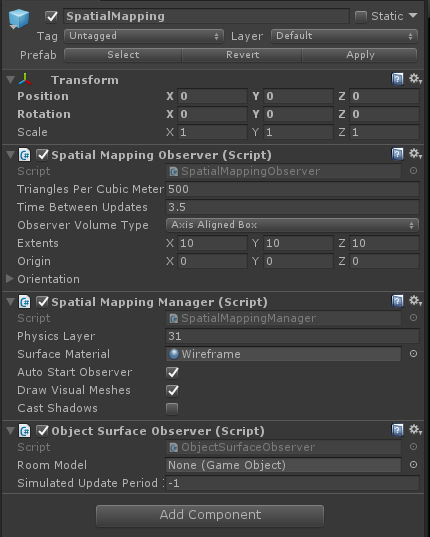
What I assume is that is existed prior to Unity creating their own solution using the Spatial Mapping Renderer and Spatial Mapping Collider.
Lets see what the Mixed Reality Toolkit is giving us (and of course we get all the source code so this could be useful).
So lets looks at what those scripts do (to quote the source code comments):
- class SpatialMappingObserver : SpatialMappingSource
encapsulates the SurfaceObserver into an easy to use object that handles managing the observed surfaces and the rendering of surface geometry. - class SpatialMappingManager : Singleton<SpatialMappingManager>
allows applications to use a SurfaceObserver or a stored Spatial Mapping mesh (loaded from a file). - ObjectSurfaceObserver: SpatialMappingSource
OK, so in English please… We have two classes here that are derived from a SpatialMappingSource which when looking at the code maintains a list of meshes for the surfaces around us. It has the ability to create a new surface mesh, where a surface includes the mesh itself (filter), a collider and a renderer:
public struct SurfaceObject
 {
 public int ID;
 public GameObject Object;
 public MeshRenderer Renderer;
 public MeshFilter Filter;
 public MeshCollider Collider;
 }
One point of the SpatialMappingManager is to allow us to switch between different spatial mapping sources. There are three ways to populate a SpatialMappingSource that I can see:
- SpatialMappingObserver
Probably the most important is mapping the actual physical space in real-time and creating a SpatialMappingSource that has the meshes, rendering and colliders.
This class uses the Unity native SurfaceObserver (which is actually mapping the real world space) and by routinely calling it’s Update() method (set in the prefab) it will get new surface mesh information. It then populates that into its SpatialMappingSource so the . - ObjectSurfaceObserver
This class will create a SpatialMappingSource by using the mesh on an existing game object. - FileSurfaceObserver
This class can save and load the meshes in a SpatialMappingSource into a data file .room. That file contains simply a list of vertices and triangle indices.
Note: The SpatialMappingSource includes a SaveSpatialMeshes which is the same save as here, so we can save any source meshes to a .room file.
By default the SpatialMappingManager assumes it has a SpatialMappingObserver and if AutoStartObserver is set it will automatically start using it. Otherwise any other object with can call into the manager and set new SpatialMappingSource using SpatialMappingManager.Instance.SetSpatialMappingSource(source).
The other point of the SpatialMappingManager is to allow us to control the look of any spatial mapping source it is currently using, basically it can decide to draw the mesh (by enabling or disabling all renderers), choose which material to draw them with, and set the physics layer.
So this prefab then is useful if you want to store mesh data and reload it later on. Since the SpatialMappingObserver is attaching world anchors I kind of expected it might be updating the World Anchor Store so that our mesh can be re-used over and over to avoid the user having to rescan their space every time, but I don’t see that functionality in here. But presumably it would be straightforward enough to save the .room file then call save on each world anchor’s mesh and link it back to the correct mesh.
Lets do a little example. We’ll create an app that scans the room and saves it to a .room file.
I added a game object with my GlobalSelect script, and then also added the script below to save the room:
using System.Collections;
using System.Collections.Generic;
using UnityEngine;
using HoloToolkit.Unity.SpatialMapping;

public class SaveSpatialMapping : MonoBehaviour {

    public SpatialMappingObserver observer;

    public void Save () {
        Debug.Log("Saving mesh...");
        observer.SaveSpatialMeshes("office");
    }

}
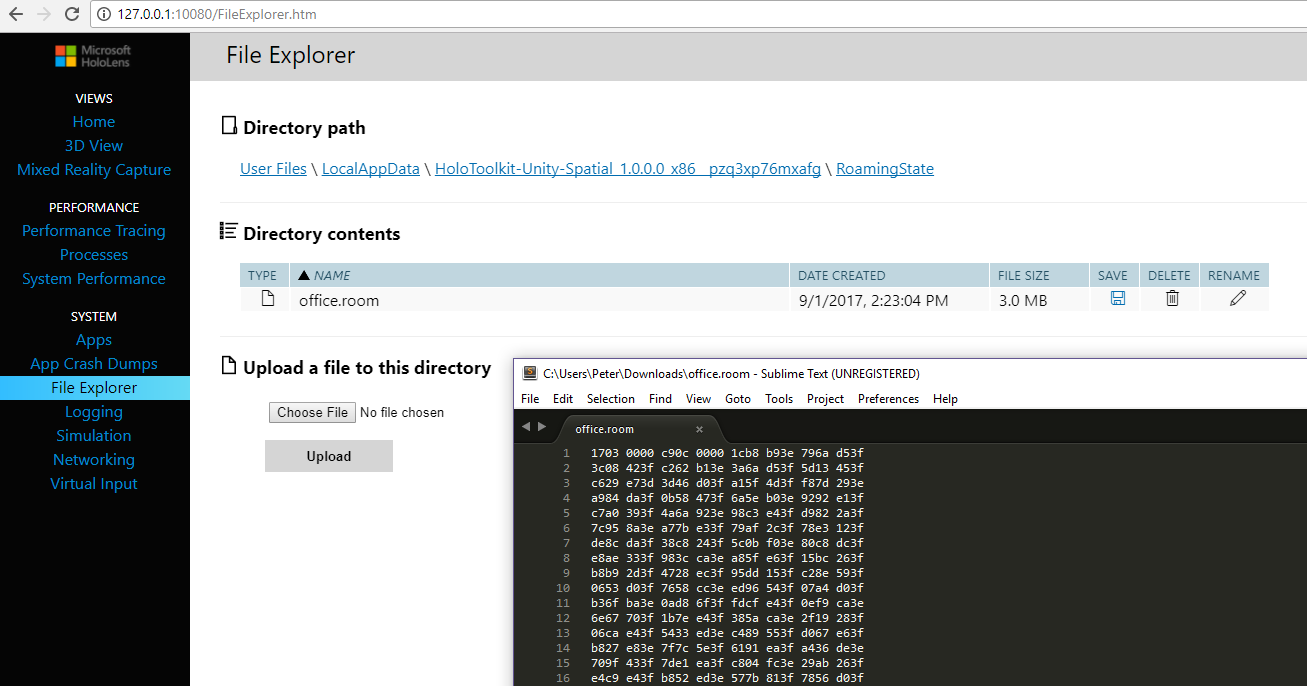
Lets build and run this on the Hololens. I take a quick look around, then perform an AirTap to save the mesh to a file named office.room.
One of the easiest ways to access the file is via the HoloLens built in web server. I can open my browser in WIndows (the HoloLens is plugged into USB), go to the File Explorer section, and navigate to your app and look under RoamingState and your .room file will be there.
Now let’s load it back into Unity:
Let’s add a FileSurfaceObserver component onto our SurfaceMapping prefab and by clicking “Open File Location” we’ll have a file explorer where we can drag in the office.room file we just downloaded above.
Return to Unity and name the “Mesh File Name” property on the component to “office” (without the extension).
Now run Unity, and press the ‘L’ key on the keyboard to load the mesh. Wow! How amazing is that, a full mesh of my space (even rooms I haven’t been in recently) app appear in Unity’s scene editor!
The result is here:
Mixed Reality Toolkit Spatial Processing
The problem (and benefit) of spatial mapping (either the native one or toolkit spatial mapping prefab) is that you end up with a complex mesh for the spaces, they don’t match perfectly with the actual surfaces in your space.
So what to do? Many times we just want to get the floor, ceilings and walls. How can we do that with spatial mapping? We can raycast against the surface mesh, but it can be full of holes and irregular (bumpy).
That’s where “Spatial Processing” comes in, it’s purpose is to make sense of the spatial mesh and improve it for your app.
Now even though I watched Holograms 230 I really couldn’t understand what it was about. I thought it was a specific component that you used. But it’s more of a broad concept for processing the mesh, and some of the implementation is left up to you depending on the needs of your app. What they do provide in the Mixed Reality Toolkit is a couple of useful scripts such as SurfaceMeshesToPlanes.cs and RemoveSurfaceVertices.cs to get us started.
SurfaceMeshesToPlanes can find you certain surfaces in the mesh and add in planes to your scene so you get one continuous flat surface to work with. It is a singleton utility that you can call MakePlanes() on and it take mesh data from a SpatialMappingSource (via the other singleton SpatialMappingManager) and it has some clever source code to try and extract just those plane surfaces from the mesh, namely floors, ceiling and walls. As it’s a potentially heavy operation it will take multiple frames, and then calls back on the event MakePlanesComplete.
The important part (for us) here is that we have to have our own code to call MakePlanes() from, and we should probably only call that once the user has been asked to perform a basic scan, so there is enough mesh data for SurfaceMeshesToPlanes to use to detect planes.
Here is an overview:
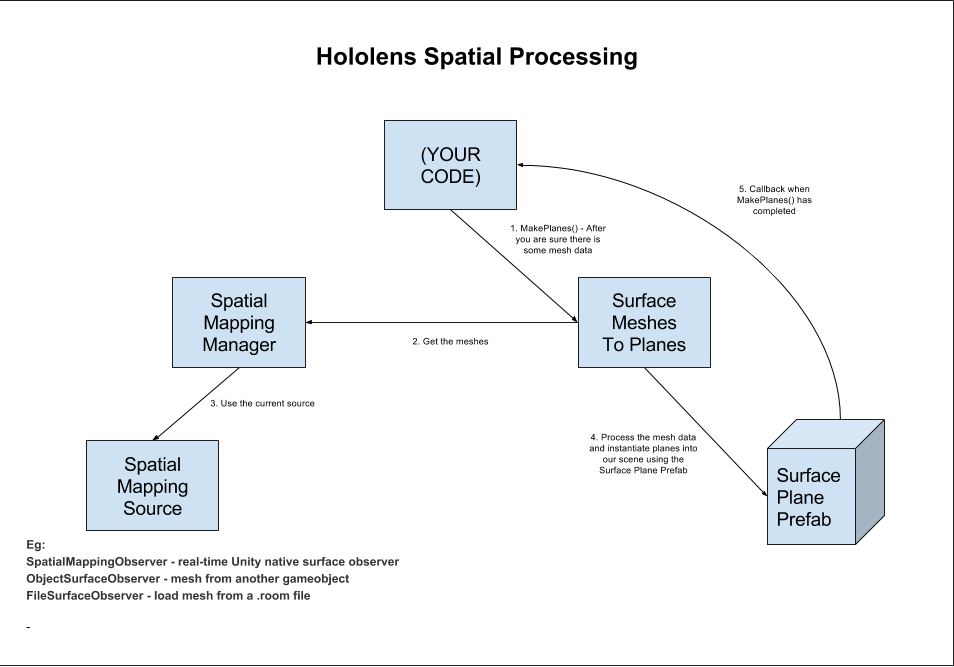
A good example of our “(YOUR CODE)” above is to look at this example scene in the toolkit:
HoloToolkit-Tests/SpatialMapping/Scenes/SpatialProcessing.
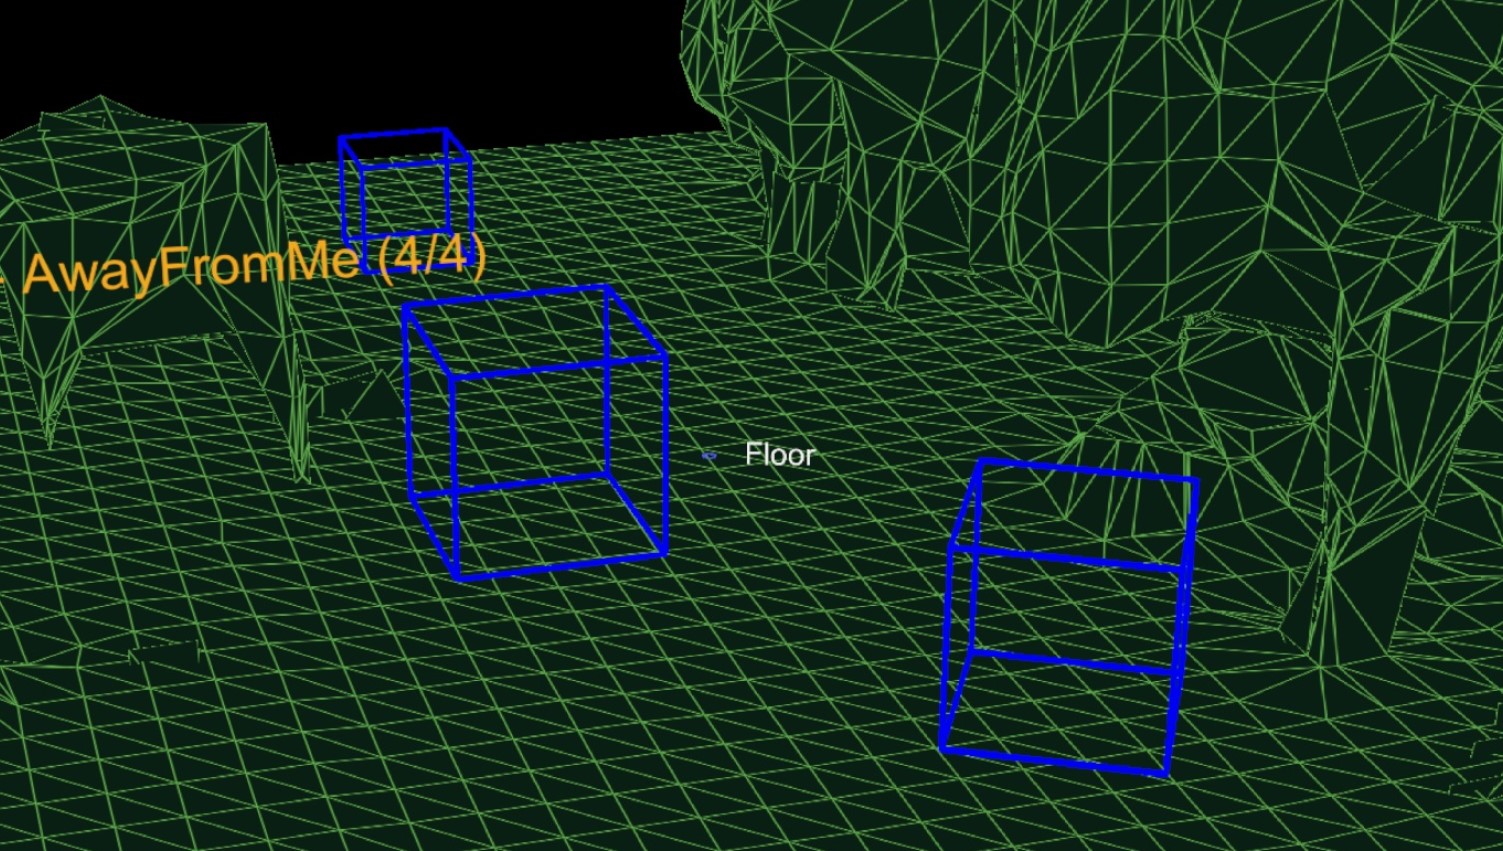
Here is what it looks like when I run that scene in my space:
Notice how it does do the job asked – finding the floor, ceiling and walls. But it’s not great. So the use really depends on your needs and how you will use these planes.
Probably the most useful part I could see is just to get the location of the floor (or ceiling). When I look through the source code for SurfaceMeshesToPlanes, for the floor it basically searches through the mesh data to find the lowest Y vertices, and that is determined to be the floor. So we can then access these properties:
        /// <summary>
        /// Floor y value, which corresponds to the maximum horizontal area found below the user's head position.
        /// This value is reset by SurfaceMeshesToPlanes when the max floor plane has been found.
        /// </summary>
        public float FloorYPosition { get; private set; }

        /// <summary>
        /// Ceiling y value, which corresponds to the maximum horizontal area found above the user's head position.
        /// This value is reset by SurfaceMeshesToPlanes when the max ceiling plane has been found.
        /// </summary>
        public float CeilingYPosition { get; private set; }
Here is what the setup in that scene is for spatial processing:
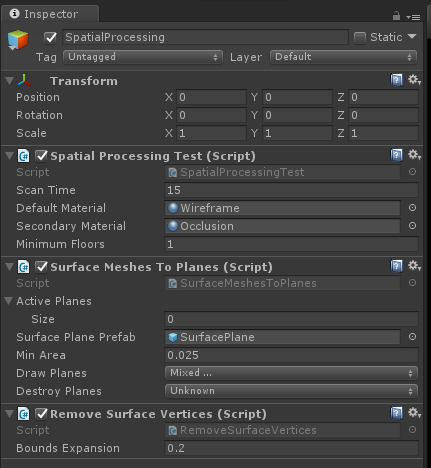
The “Spatial Processing Test” script is basically the “(YOUR CODE)” I refer to above. It is watching for mesh changes and calling MakePlanes() on the SurfaceMeshesToPlanes and RemoveSurfaceVertices singleton scripts you see below it. You can customise the settings on those scripts depending on what you would like to happen.
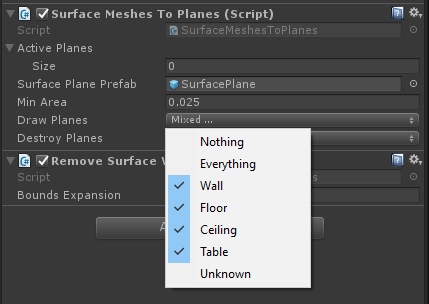
In SurfaceMeshesToPlanes it has support for the following plane detection:
As spatial processing is more of a part-solution then a full solution, it means it leaves it up to you to get the user to scan their environment to generate useful spatial mesh data, which we’ll see is going to be tackled a bit more formally with Spatial Understanding.
Spatial Understanding
Spatial Processing helps us made some sense of the crazy space our user is in – just identifying the floor and ceiling can help our applications, but random planes around us in an otherwise holey mesh leaves a lot to be desired.
Imagine if we could have a not only a completely sealed water tight spatial mesh – no holes big and small, but one that is uniform and more accurate then the crazy spatial mapping mesh. Imagine if we knew that play space was at least a certain size. Imagine if we knew what parts were walls, floor or ceiling. Taken further, image identifying raised platforms, or even types of furniture like chairs and couches. And lets get crazier still, imagine finding those surfaces that are large enough to take our holograms…
Well imagine it not, because thanks to Asobo Studios we can have all of this! They shared their source code via a DLL into the Mixed Reality Toolkit for Unity! (They don’t mention where to send the beer to though).
The price you pay is the user must scan their play space before you can understand it. That means the user has to be instructed to look and walk around for a minute while you give them feedback of how much coverage they have mapped before you lock in the scan and generate the understanding spatial map and start being able to query against it.
Spatial Understanding internally stores the plays pace as a grid of 8cm sized voxel cubes to give us a more uniform spatial mesh:
Here is a good overview of the Mixed Reality Toolkit Spatial Understanding demo scene from Thought Experiment Studios:
Microsoft has published a good overview of Spatial Understanding here.
But it wasn’t clear to me exactly from that how Spatial Understanding actually works in Unity, and how we use it. The answer came from looking at the SpatialUnderstandingExample scene in Unity (which is the one used in the video above).
Here’s what I worked out:

Basically you need 2 prefabs in your scene:
- Spatial Mapping Prefab
- Spatial Understanding Prefab
Now you need our old friend the Spatial Mapping Prefab because it’s function of scanning in the room and generating a mesh (or loading an existing mesh) is still useful, and will actually be the spatial mesh passed to the Spatial Understanding DLL code to be converted into our new improved Understanding mesh.
Basically the job of the Spatial Understanding component is to pull in the current spatial mesh from the mapping manager (via the Spatial Understanding Source Mesh) and pass it into the Understanding DLL where it will be used to generate the Understanding mesh.
Then, it periodically pulls that mesh from the DLL and converts it into mesh and colliders in our Unity scene (via the Spatial Understanding Custom Mesh). How does that cool green mesh we see get drawn? Well the Spatial Understanding Custom Mesh is derived from Spatial Mapping Source, which amoungst other tasks generates a mesh that can be rendered, and generates a mesh collider for physics and collision detection. Neat.
The other thing you need in your scene is some custom code (that you write) to tell Spatial Understanding that the scan is complete and to query it about the environment.
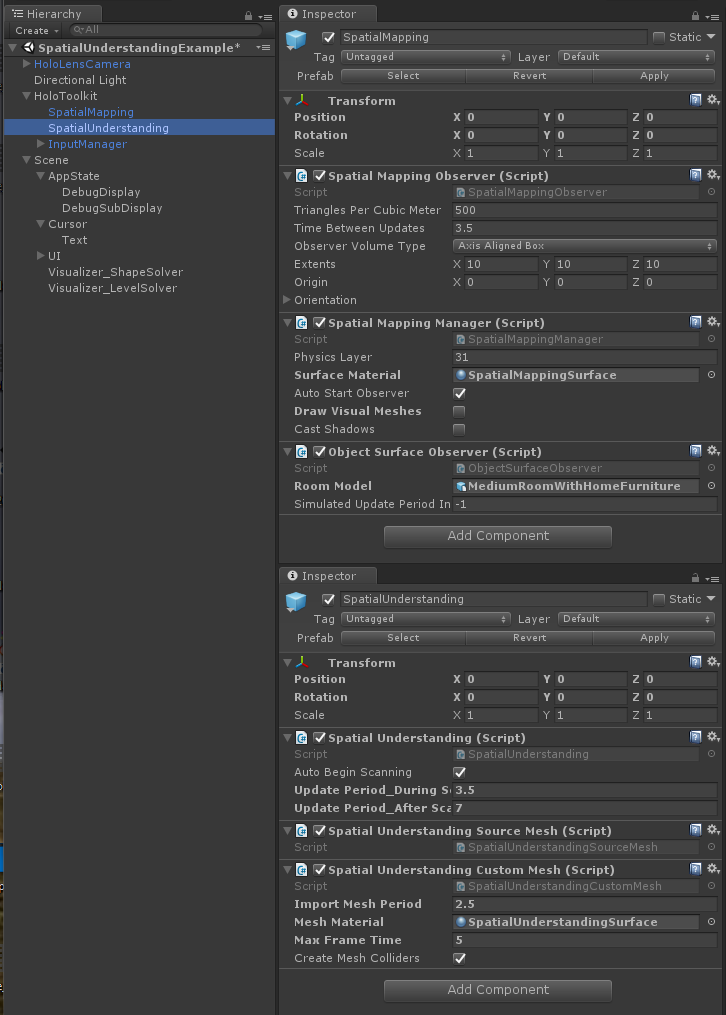
Here is what the 2 prefabs look like in the scene:
To get started open and build the SpatialUnderstandingExample scene, and run it on your Hololens. You will see the same scene as in the video above.
Since we know that both the Spatial Mapping Manager with the Spatial Mapping Observer are in the scene, we can enable it to render by setting the “Draw Visual Meshes” property and we can then compare the spatial mapping mesh (in white) with the spatial understanding mesh (in green):
Here’s one example of a query in Spatial Understanding: Raycasting. You can use the PlayspaceRaycast function to send out a ray, and if it collides with an Understanding mesh, it will return a RaycastResult which will tell you what type of surface it is, where the ray intersected in space, and the intersection normal.
So, if you have an application that needs to really understand the space the user is standing in and you are OK with having the user scan their space before beginning, the the Spatial Understanding module is really an impressive system to use.
Leave a Reply