Here I am with 8 weeks to go, and still deep diving into the features of HoloLens! Goodness – so much to learn and so little time!
But there are a few important areas of input I need to explore, and I’ve done that this week.
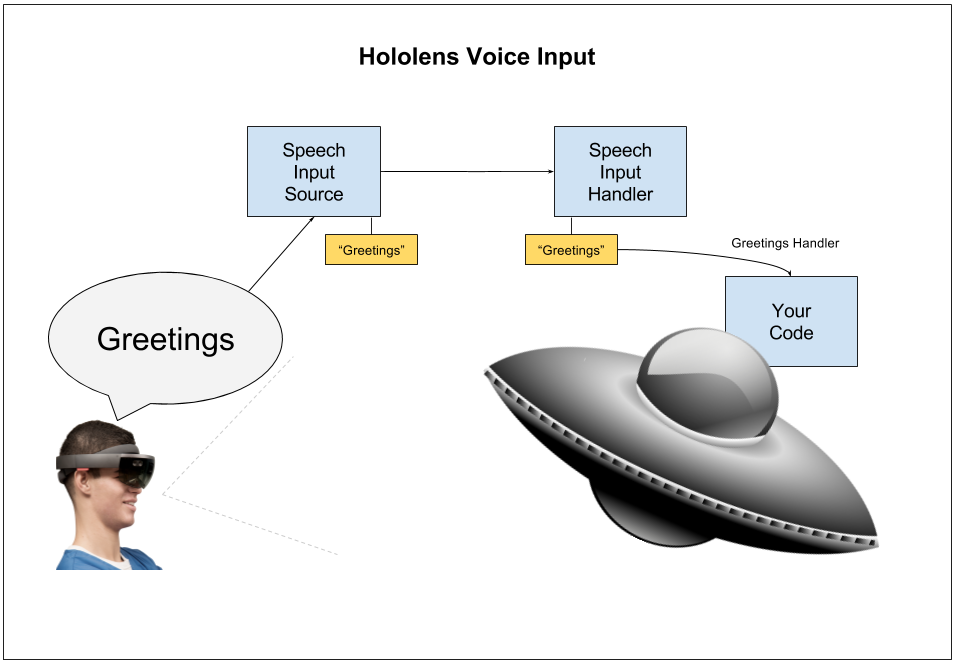
Voice Input using the Speech Input Source
Voice is a useful input mechanism with the HoloLens, being able to say “Select” instead of trying to AirTap is really useful.
The good news is it’s really easy to add support for voice phrases to your Unity3d app.
The first place you probably visited was Holograms 212 but please be aware that uses the KeywordManager and that is now deprecated in favour of the Speech Input Source. All of these are available in the Mixed Reality Toolkit for Unity.
You need to add in the SpeechInputSource component and register a set of phrases with it that you want your app to respond to. The phrases can trigger event listeners on SpeechInputHandler components that you attach to game objects in your scene.
Watch my dev overview video:
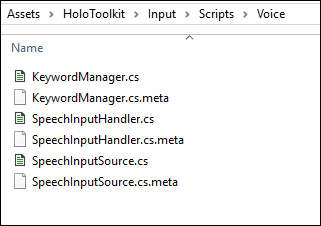
You can find all the voice input scripts under HoloToolkit/Input/Scripts/Voice:
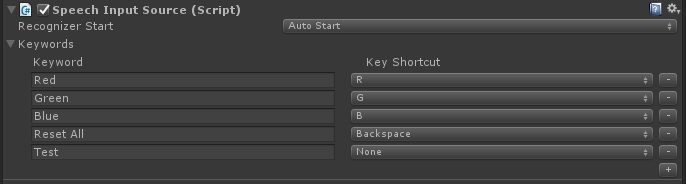
Please note: The SpeechInputSource has a dependancy on the InputManager – which it uses to optionally route events to only the currently selected (gazed at) game object in the scene. So here I add the InputManager prefab, and then add the SpeechInputSource to the same game object:
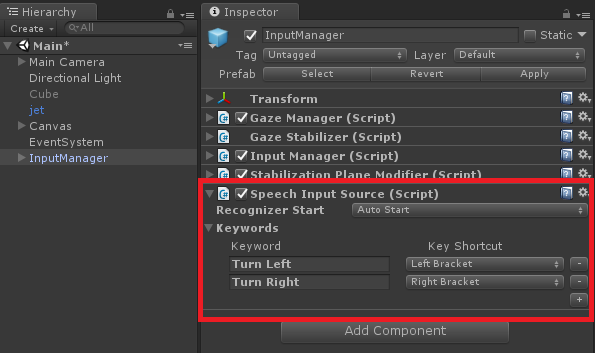
You can see above I have registered two phrases “Turn Left” and “Turn Right” and set recognizer to auto start so it is constantly listening when our app starts up.
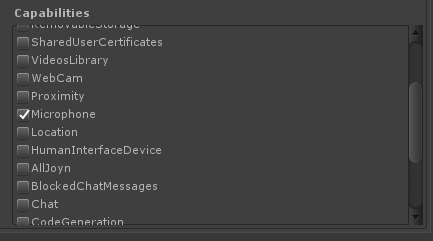
Make sure you also enable the Microphone Capability in project settings so your app is allowed to access the microphone for voice input:
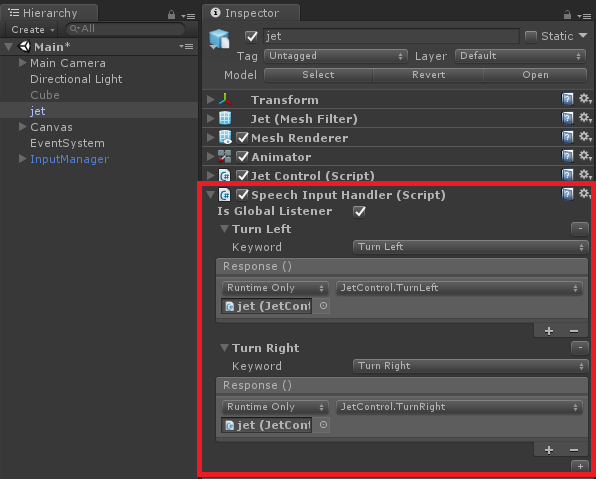
Next to actually handle those keywords being spoken, you need to add in a SpeechInputHandler component. Speech can be handled either globally or locally. If you checkmark “Is Global Listener” then your handler is called no matter where the user is looking, but if you don’t checkmark it, then the Speech Input Source will only route it to the game object that is currently selected by the Input Manager – which means the current game object (with collider) that the user is looking at.
So here I added a global listener, and add event handlers for both my key word phrases. So no matter where the user is looking, my script methods will get called when the user speaks the phrase:
The challenge is to make sure your users know that voice input is enabled, and give them a fall back option if they can’t or don’t wish to use voice input.
Raw Camera
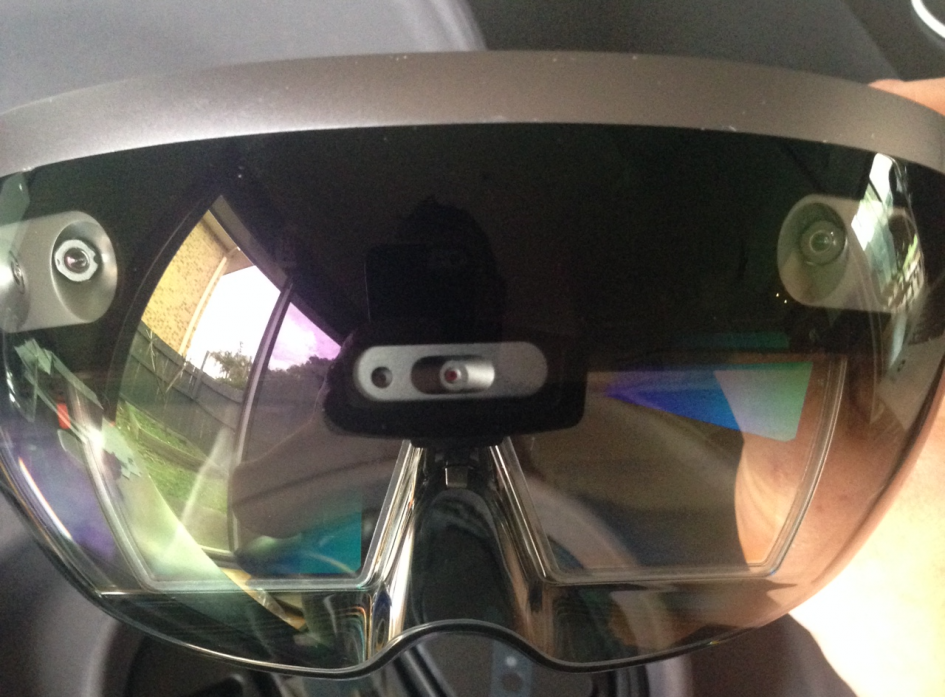
Important to me is to use the built in front facing camera on the HoloLens to scan in content from the real world.
The HoloLens raw camera feed (that is just what it sees – not any Holographic content we have placed in our space) can be accessed via the standard Unity WebCamTexture API:
Using the WebCamTexture we can also access the pixels via GetPixels() so that we can do image processing on the image.
Here is my script that snaps a photo from the camera and displays it in the scene:
HoloCamera.cs:
using System.Collections;
using System.Collections.Generic;
using UnityEngine;

public class HoloCamera : MonoBehaviour {

    WebCamTexture webcam;

    void Start () {
        webcam = new WebCamTexture();
        webcam.Play();
        Debug.LogFormat("webcam: {0} {1} x {2}", webcam.deviceName, webcam.width, webcam.height);
    }

    public Texture2D TakePhoto() {
        Debug.Log("Take Photo");

        Texture2D webcamImage = new Texture2D(webcam.width, webcam.height);
        webcamImage.SetPixels(webcam.GetPixels());
        webcamImage.Apply();

        return webcamImage;
    }

    public void TakePhotoToPreview(Renderer preview) {
        Texture2D image = TakePhoto();
        preview.material.mainTexture = image;

        // update the aspect ratio to match webcam
        float aspectRatio = (float)image.width / (float)image.height;
        Vector3 scale = preview.transform.localScale;
        scale.x = scale.y * aspectRatio;
        preview.transform.localScale = scale;
    }

    public void InstantiatePhoto(GameObject prefab) {
        Debug.Log("InstantiatePhoto");
        GameObject go = GameObject.Instantiate(prefab, Camera.main.transform.position + Camera.main.transform.forward * 0.5f, Camera.main.transform.rotation);
        TakePhotoToPreview(go.transform.GetChild(0).GetComponent<Renderer>());
    }

}
Locatable Camera
As handy as it is to get the raw camera, there are 3 glaring commissions:
1. How can we also snap the holograms in the camera’s view (just like the built in photo capture experience)?
2. How do we know exactly where the camera is in unity world-space so that we can map images in the camera from the real-world?
3. How can we set the resolution of the image capture?
Well, I was very pleased to see that HoloLens has an API to capture photos with those cases solved, and they call is a Locatable Camera. And most importantly, it is exposed in Unity!
You can read the official HoloLens documentation here:
https://developer.microsoft.com/en-us/windows/mixed-reality/locatable_camera
And the Unity documentation which shows various capture scenarios (to Textures or files):
https://developer.microsoft.com/en-us/windows/mixed-reality/locatable_camera_in_unity
Capture Formats
From the Microsoft documentation we can see the current resolutions supported for capturing stills and videos:

I’ve highlighted the high resolution still photo there (2048×1152), as it is considerably higher then we captured with the raw camera in Unity WebCamTexture (1268×720). And interestingly, it’s also higher then the standard photo capture (“Hey Cortana Take a Photo”, or dual-press the volume buttons).
Demo
So lets see if we can use this to update our code above to capture high resolution camera images with the Holograms and put them into our scene!
Reminder: Make sure to set your publishing settings: WebCam and Microphone capabilities.
First I’ll take a copy of my script above and rename it LocatableCameraCapture and I’ll disable the old script in my scene and instead use this one.
Now in the scene my HoloTap event was firing the HoloCamera->InstantiatePhoto(frame) method, just fix it so it calls the same method on the new script.
So the main difference is that the PhotoCapture API is asynchronous, so when we receive the event to take the photo, we’ll store the target Renderer while we wait for the callbacks to fire.
So here I’ve updated our script above to support the Locatable Camera API:
Important Note: To capture Holograms you need to both set hologramOpacity to 1.0f AND pass true as the first parameter to PhotoCapture.CreateAsync (This is set to false in the online examples).
LocatableCameraCapture.cs:
using System.Collections;
using System.Collections.Generic;
using UnityEngine;
using UnityEngine.VR.WSA.WebCam;
using System.Linq;

public class LocatableCameraCapture : MonoBehaviour {

    PhotoCapture photoCaptureObject = null;

    Renderer previewRenderer;
    void TakePhotoToPreview(Renderer preview) {
        previewRenderer = preview;
        PhotoCapture.CreateAsync(true, OnPhotoCaptureCreated);
    }

    void OnPhotoCaptureCreated(PhotoCapture captureObject) {
        photoCaptureObject = captureObject;

        Resolution cameraResolution = PhotoCapture.SupportedResolutions.OrderByDescending((res) => res.width * res.height).First();

        CameraParameters c = new CameraParameters();
        c.hologramOpacity = 1.0f; // 0 means we don't see any holograms
        c.cameraResolutionWidth = cameraResolution.width;
        c.cameraResolutionHeight = cameraResolution.height;
        c.pixelFormat = CapturePixelFormat.BGRA32;

        captureObject.StartPhotoModeAsync(c, OnPhotoModeStarted);
    }

    void OnStoppedPhotoMode(PhotoCapture.PhotoCaptureResult result) {
        photoCaptureObject.Dispose();
        photoCaptureObject = null;
    }

    private void OnPhotoModeStarted(PhotoCapture.PhotoCaptureResult result) {
        if (result.success) {
            photoCaptureObject.TakePhotoAsync(OnCapturedPhotoToMemory);
        } else {
            Debug.LogError("Unable to start photo mode!");
        }
    }
    void OnCapturedPhotoToMemory(PhotoCapture.PhotoCaptureResult result, PhotoCaptureFrame photoCaptureFrame) {
        if (result.success) {
            // Create our Texture2D for use and set the correct resolution
            Resolution cameraResolution = PhotoCapture.SupportedResolutions.OrderByDescending((res) => res.width * res.height).First();
            Texture2D targetTexture = new Texture2D(cameraResolution.width, cameraResolution.height);
            // Copy the raw image data into our target texture
            photoCaptureFrame.UploadImageDataToTexture(targetTexture);
            // Do as we wish with the texture such as apply it to a material, etc.

            previewRenderer.material.mainTexture = targetTexture;
            // update the aspect ratio to match webcam
            float aspectRatio = (float)targetTexture.width / (float)targetTexture.height;
            Vector3 scale = previewRenderer.transform.localScale;
            scale.x = scale.y * aspectRatio;
            previewRenderer.transform.localScale = scale;

            // location
            Matrix4x4 cameraToWorldMatrix;
            photoCaptureFrame.TryGetCameraToWorldMatrix(out cameraToWorldMatrix);
            Matrix4x4 worldToCameraMatrix = cameraToWorldMatrix.inverse;

            Matrix4x4 projectionMatrix;
            photoCaptureFrame.TryGetProjectionMatrix(out projectionMatrix);
            Vector3 position = cameraToWorldMatrix.MultiplyPoint(Vector3.zero);
            previewRenderer.transform.position = position;
        }
        // Clean up
        photoCaptureObject.StopPhotoModeAsync(OnStoppedPhotoMode);
    }


    public void InstantiatePhoto(GameObject prefab) {
        Debug.Log("InstantiatePhoto");
        GameObject go = GameObject.Instantiate(prefab, Camera.main.transform.position + Camera.main.transform.forward * 0.5f, Camera.main.transform.rotation);
        TakePhotoToPreview(go.transform.GetChild(0).GetComponent<Renderer>());
    }
}
Capturing Photos To Files
We can also use the PhotoCapture API to capture the photo directly to a file (without us having to process pixels or use Unity’s Texture2D.EncodeToJPG.
The same TakePhotoAsync() method we used above, will write directly to a file if we give it a file path:
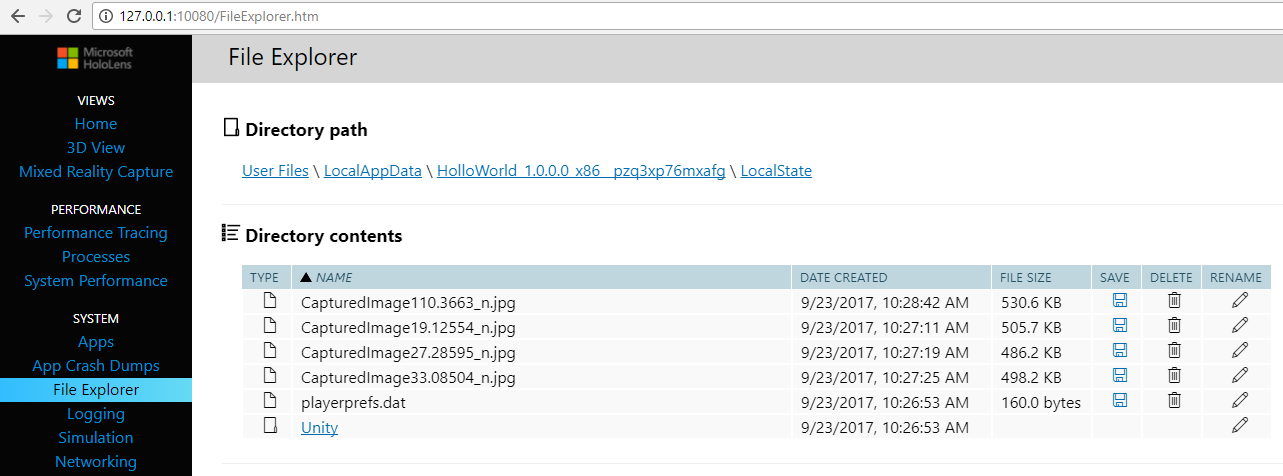
So here is my new photo capture script. Just call the TakePhoto() method and it will save a photo to your LocalState, which you can browse via the HoloLens File Explorer:
PhotoCaptureToFile.cs:
using System.Collections;
using System.Collections.Generic;
using UnityEngine;
using UnityEngine.VR.WSA.WebCam;
using System.Linq;

public class PhotoCaptureToFile : MonoBehaviour {

    PhotoCapture photoCaptureObject = null;

    public void TakePhoto() {
        Debug.Log("TakePhoto");
        PhotoCapture.CreateAsync(true, OnPhotoCaptureCreated);
    }

    void OnPhotoCaptureCreated(PhotoCapture captureObject) {
        photoCaptureObject = captureObject;

        Resolution cameraResolution = PhotoCapture.SupportedResolutions.OrderByDescending((res) => res.width * res.height).First();

        CameraParameters c = new CameraParameters();
        c.hologramOpacity = 1.0f;
        c.cameraResolutionWidth = cameraResolution.width;
        c.cameraResolutionHeight = cameraResolution.height;
        c.pixelFormat = CapturePixelFormat.BGRA32;

        captureObject.StartPhotoModeAsync(c, OnPhotoModeStarted);
    }

    void OnStoppedPhotoMode(PhotoCapture.PhotoCaptureResult result) {
        photoCaptureObject.Dispose();
        photoCaptureObject = null;
    }

    private void OnPhotoModeStarted(PhotoCapture.PhotoCaptureResult result) {
        if (result.success) {
            string filename = string.Format(@"CapturedImage{0}_n.jpg", Time.time);
            string filePath = System.IO.Path.Combine(Application.persistentDataPath, filename);

            photoCaptureObject.TakePhotoAsync(filePath, PhotoCaptureFileOutputFormat.JPG, OnCapturedPhotoToDisk);
        } else {
            Debug.LogError("Unable to start photo mode!");
        }
    }

    void OnCapturedPhotoToDisk(PhotoCapture.PhotoCaptureResult result) {
        if (result.success) {
            Debug.Log("Saved Photo to disk!");
            photoCaptureObject.StopPhotoModeAsync(OnStoppedPhotoMode);
        } else {
            Debug.Log("Failed to save Photo to disk");
        }
    }


}
Leave a Reply