“Plans are useless, but Planning is indispensable”
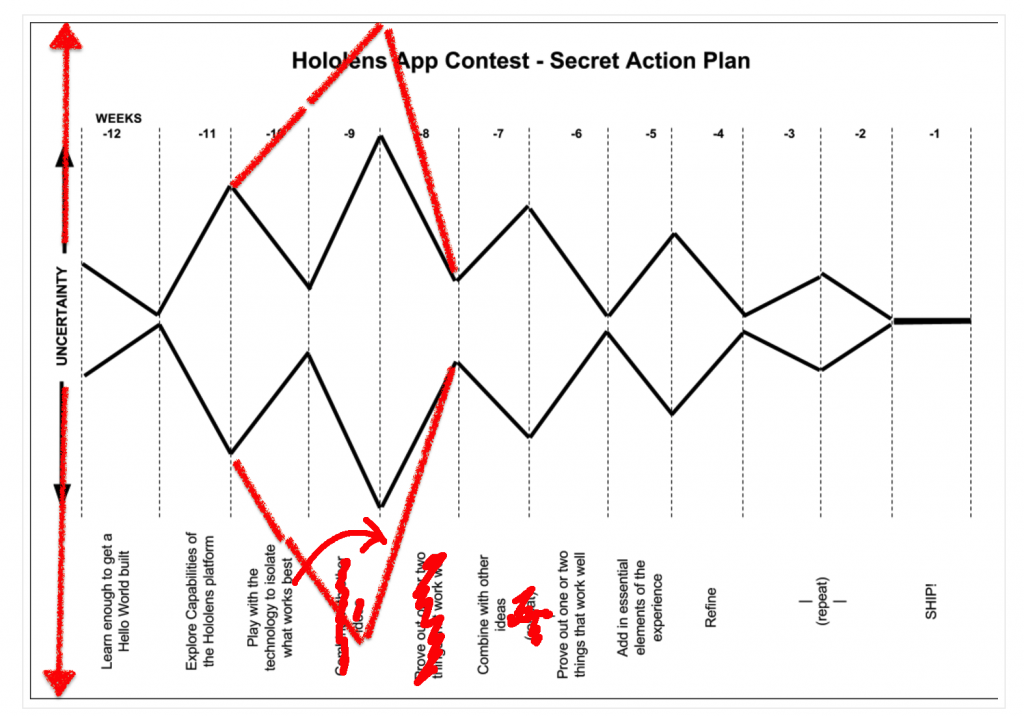
Thanks Dwight D. Eisenhower, you nailed it. So it turns out I was overly ambitious to think I could explore all the features of a new platform like Hololens in a single week. Even with two weeks I’ve only maybe explore maybe half the features? That’s if I’m lucky – I mean I haven’t even got to camera, voice,, sound, sharing, networking and multi-user, and probably more. Holey moley.
So here’s a slight revision to my original plan:
Networking
I want to get started with networking on Hololens, but get started slowly and build up and verify what works.
UDP Broadcast Network Logging
So if you know me, I am a big fan of UDP networking. Just the ease and light weight of a session-less protocol works in many use-cases.
I have some code I wrote that I like to drop in to broadcast debug logs on the network so I can quickly see the debug traces of wireless devices like the Hololens. Now I want to see if that runs on Hololens.
The code is quite simple using the Application.logMessageReceived event to listen for new log messages, and then it broadcasts it over UDP with ASCII to the whole network segment.
You can use a free tool such as SocketTest to listen to UDP packets on any port. Just launch the app, go to UDP tab, set port to 9999 and press Start Listening.
Now my code used UdpClient which is not supported under UWP. Instead I had switch to DatagramSocket and all the extra (ugly) asynchronous code that entails.
But here is the final script below. Drag it onto any game object in your scene:
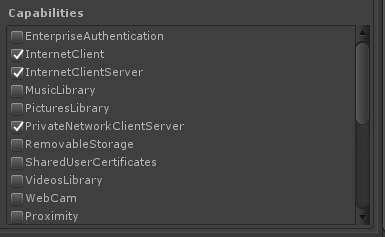
Note: You must enable the networking capabilities ( InternetClient, InternetClientServer and PrivateNetworkClientServer) in your project settings:
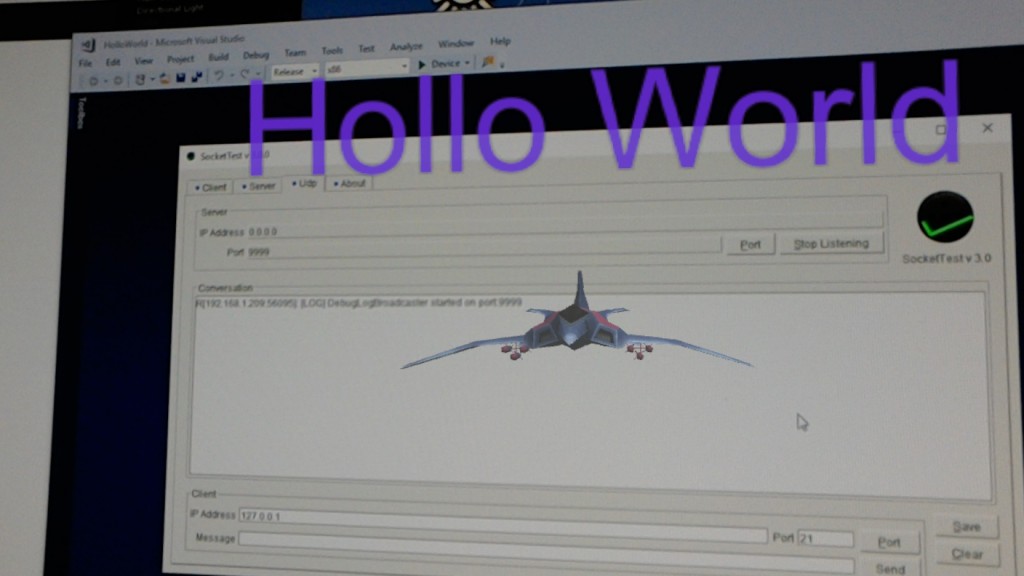
Here’s what it looks like viewing through the Hololens looking at SocketTest on my desktop screen:
Now that is very cool (and useful to drag one script and debug wirelessly) !
DebugLogBroadcaster.cs:
using UnityEngine;
using System;
using System.Text;
using System.Net.Sockets;
using System.Net;
#if WINDOWS_UWP
using Windows.Networking.Sockets;
using Windows.Networking.Connectivity;
using Windows.Networking;
#endif

/*
 * Broadcast all Debug Log messages on the current WiFi network
 * By Peter Koch <peterept@gmail.com>
 *
 * Use this with any UDP Listener on your PC
 * eg: SocketTest
 *     http://sourceforge.net/projects/sockettest/
 *     Launch the app, go to UDP tab, set port to 9999 and press Start Listening
 *
 * Important Note:
 *  - Callstacks are only sent in non-editor builds when "Development Build" is checkmarked in Build Settings
 */
public class DebugLogBroadcaster : MonoBehaviour
{
    public int broadcastPort = 9999;

#if WINDOWS_UWP
    HostName hostName;
    DatagramSocket client;
#else
    IPEndPoint remoteEndPoint;
    UdpClient client;
#endif

    void OnEnable()
    {
#if WINDOWS_UWP
        hostName = new Windows.Networking.HostName("255.255.255.255");
        client = new DatagramSocket();
#else
        remoteEndPoint = new IPEndPoint(IPAddress.Broadcast, broadcastPort);
        client = new UdpClient();
#endif
        Application.logMessageReceived += HandlelogMessageReceived;
        Debug.Log("DebugLogBroadcaster started on port:" + broadcastPort);
    }

    void OnDisable()
    {
        Application.logMessageReceived -= HandlelogMessageReceived;
#if !WINDOWS_UWP
        client.Close();
        remoteEndPoint = null;
#endif
        client = null;
    }

// DatagramSocket needs to run in an async routine to dispatch an async threading task
#if WINDOWS_UWP
    async
#endif
    void HandlelogMessageReceived (string condition, string stackTrace, LogType type)
    {
        string msg = string.Format ("[{0}] {1}{2}",
                                   type.ToString ().ToUpper (),
                                   condition,
                                   "\n    " + stackTrace.Replace ("\n", "\n    "));
#if WINDOWS_UWP
         await SendUdpMessage(msg);

#else
        byte[] data = Encoding.UTF8.GetBytes(msg);
        client.Send(data, data.Length, remoteEndPoint);
#endif
    }

#if WINDOWS_UWP
    private async System.Threading.Tasks.Task SendUdpMessage(string message) {
        using (var stream = await client.GetOutputStreamAsync(hostName, broadcastPort.ToString())) {
            using (var writer = new Windows.Storage.Streams.DataWriter(stream)) {
                var data = Encoding.UTF8.GetBytes(message);
                writer.WriteBytes(data);
                await writer.StoreAsync();
            }
        }
    }
#endif
}
Web Server
I’m impressed with how many smart choices were made in the creation of the HoloLens. And one of those I hadn’t heard of before I started this exploration of HoloLens – and that is the built in web server to let you access and manage your HoloLens portal with any web browser.
Now I love that, and I wanted to have the same capability in my Unity app so that I and others could connect into it via a web browser to enable some collaboration and improvements in how you can get content into HoloLens.
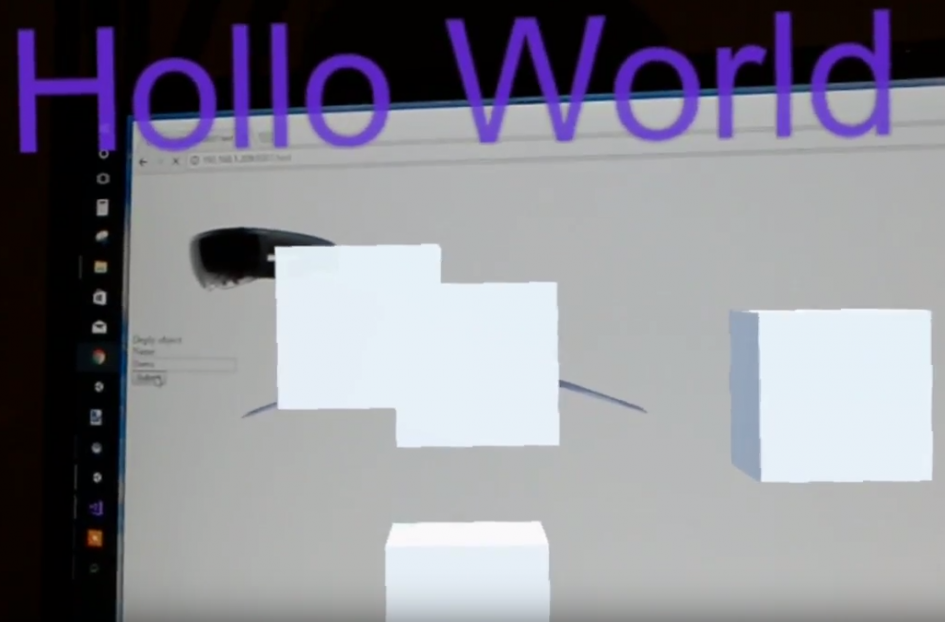
And I can report it works! Here is what I came up with – In the example below I can add game objects in front of the user in the HoloLens:
How did I do this? I couldn’t find an off the shelf web server in the Unity asset store, and most of the source code I found used HttpListener – which isn’t supported in UWP.
But I did find this simple c# http server on github which uses StreamSocketListener (which is supported on HoloLens).
I forked this and added support for Unity3d.
I added calling back on the main thread and using custom attributes to make it simpler to add in a route handler.
Just drag in my code from github, and then here is an example of how to have a page that adds cubes in front of the user:
DemoRoute.cs
using System.Collections;
using System.Collections.Generic;
using UnityEngine;
using StreamSocketHttpServer;
using System.Text;

[UnityHttpServer]
public class DemoRoute : MonoBehaviour {

    [UnityHttpRoute("/addcube")]
    public void RouteAddCube(HttpRequest request, HttpResponse response) {

        // spawn a cube 1m in front of where the user is looking
        GameObject cube = GameObject.CreatePrimitive(PrimitiveType.Cube);
        cube.transform.position = Camera.main.transform.position + Camera.main.transform.forward;
        cube.transform.localScale = new Vector3(0.1f, 0.1f, 0.1f);

        response.Redirect("/");
    }
}
Wow! That works really well !
Shared Experiences
One area I am most excited about in AR/VR/MR is multi-user collaboration. Everything becomes much more engaging when you are not alone in your virtual world. Last year when I took 400 kids (16 kids at a time) on a vircursion to the moon.
Now I’d heard HoloLens had multi-user capability, and I’d seen some videos, but now was finally the time to see what they have and how it works (and importantly how can I use it).
So it turns out there isn’t really a multi-user capability built in. 
But that actually makes sense, because depending on your application you will have different needs for a multi-user experience, and you will choose the appropriate multi-player framework.
Microsoft’s Mixed Reality Toolkit for Unity3d give us two solutions to get started, one a client/server system and the other based on Unity’s built-in networking UNET.
Shared Anchors and Local Co-ordinate Space
No matter which framework or middleware you choose for multi-player networking, the same basic approach is required to create a shared experience between multiple users in the same space.
A few weeks ago I looked at the world-anchor system in HoloLens, and how you can not only attach them to game objects to “lock” them into a particular position and orientation in your physical space – but how you can also save that anchor to the Anchor Store so you can reload it later to keep that content at the same anchor even if your app is relaunched.
Well the great news is those saved anchors can be shared between devices, and so those anchors can be used to inform multiple headsets about where content should be physically located in your space.
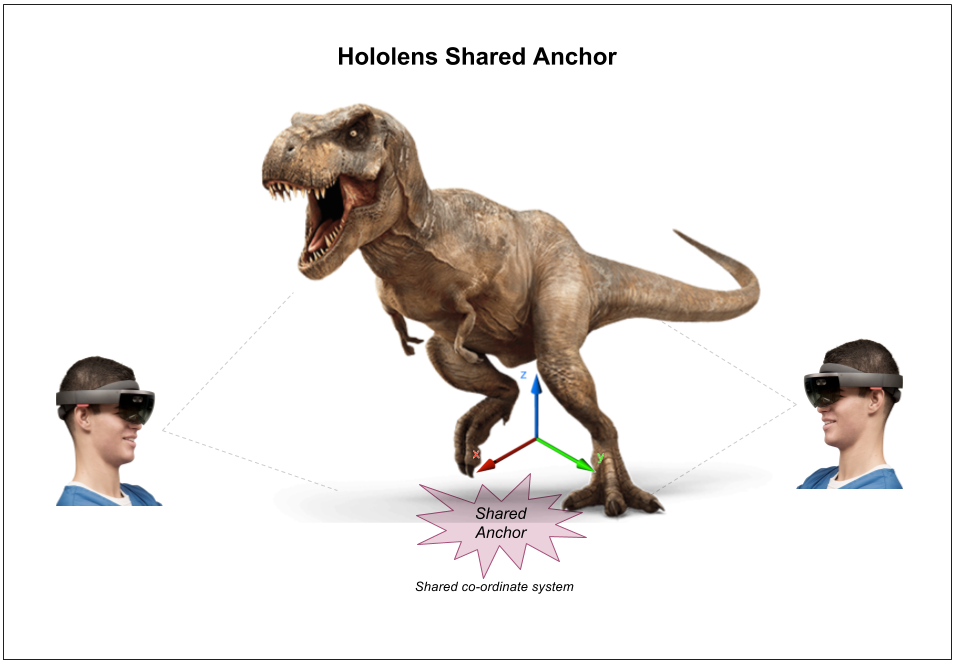
This is critical because we also saw when I started this journey that when you first launch your app the origin is set to be (0,0,0) where ever your HoloLens headset is positioned at that time. So if two users on different HoloLens’ launched the same app in different rooms, they would both have the origin set differently. If one user sent the other player the position of content (say 0,0,-2) then it would not be in the same physical space.
So the other benefit of anchors is that we can create a new co-ordinate system relative to that anchor. So below we have a dinosaur that is positioned and rotated relative to the anchor. We can send that transform to other users and they will position it relative to the anchor in their scene, and bam: content is in identical position and rotation for all users.
The simplest way to manage content is to attach your anchor to a game object that will be the parent of all content. Then whenever content is added, you need to send it’s transform relative to that parent. Parenting your content is not always possible, so if it can’t be a child, another way is to translate from it’s co-ordinate system to the local one of that anchor usingtransform.InverseTransformPoint().
Unity has it’s own documentation about Anchor Sharing.
That’s it, that’s the most important part of sharing content. Now I’ll look at some example of multi-user networking implementation.
Sharing Service (Client/Server)
If you’ve followed the Holograms 240 course online then you now know how difficult this looks – I’ve watched it several times and I still couldn’t understand what and how it works, let alone jump in and use it. The amount on contextual knowledge you need seems massive.
What I did in the end was start with the example SharingTest scene in the Mixed Reality Toolkit for Unity3d and step through all the code, and then jump to the native code in the Mixed Reality Toolkit to understand what the networking is doing.
I do finally have a grasp on it all – and it’s pretty impressive – albeit overly complex.
Before I explain how it works, I encourage you to run it yourself – it’ll help! You only need a single HoloLens (or Emulator).
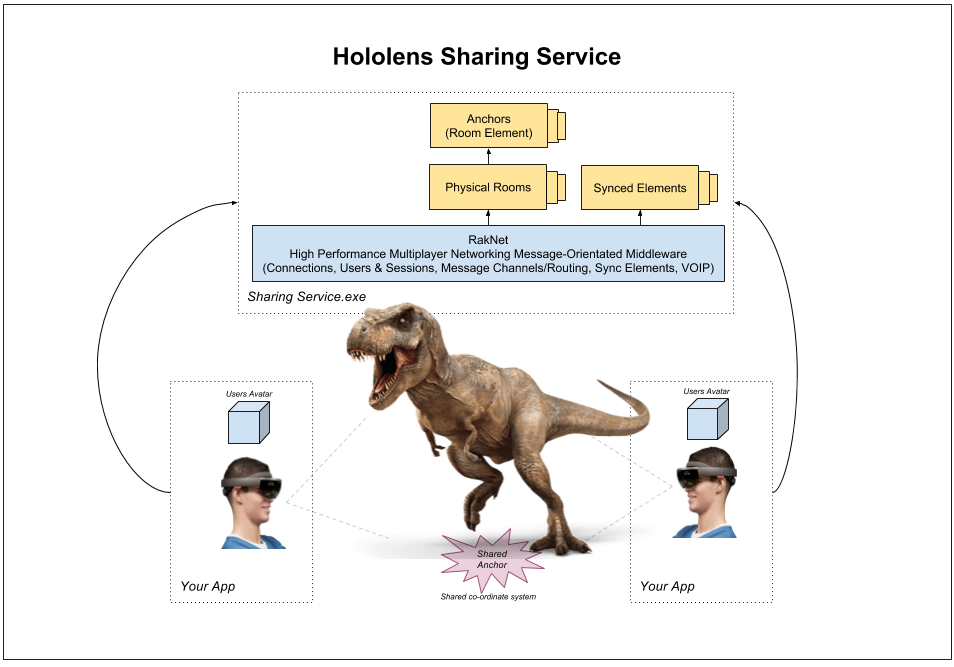
That page uses a Client-Server architecture. In this case the server is also authoritative in that it is not just a dumb generic server routing content, it has some smarts specifically implemented for HoloLens – it’s not much – but it does understand about physical rooms and anchors.
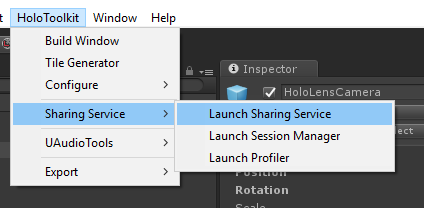
So first thing you want to do is launch the server. It comes pre-built in the toolkit. Run it by going to the HoloToolkit menu -> Sharing Service -> Launch Service:
And you’ll see the service is running in a terminal window:
If you want you can also install it as a windows service so it automatically starts up when you reboot your windows machine.
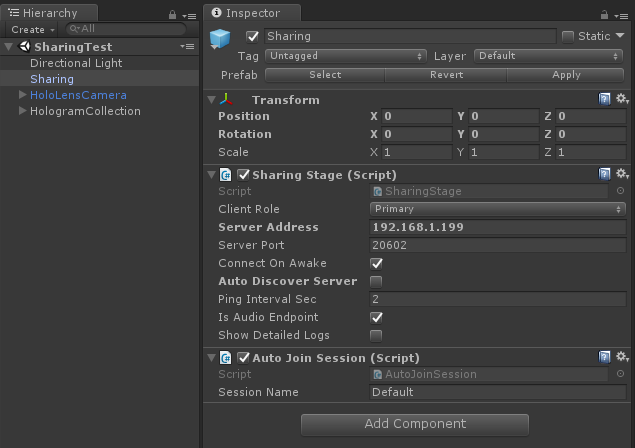
Next, open up the Sharing Test scene in Unity. Go to the sharing prefab in the scene and set the IP address of your server. If you are using the emulator you can keep it as localhost, but if you are using a real HoloLens you want to set the IP address of your server – you can easily get your IP address looking at the terminal window runnning Sharing Service.
Build for you device and run it up. The app will create an anchor and then position the white sphere at the anchor. (It also puts a cube where the heads of players are). The debug text will show that your HoloLens is connected to the server, joined the default session, created a physical room, and then uploaded it’s anchor to the room.
Now press PLAY in Unity and you will see the editor will connect to the server also, but this time it will join the existing room and download the existing anchor. If you walk around your physical room with the HoloLens you will find a purple cube that is the head of the player in Unity. Wow. It works.
I’ve recorded a more detailed overview:
RakNet
The sharing service is built upon an open-source high performance multiplayer game network engine called RakNet. RakNet was acquired by Oculus in 2014 and immediately open-sourced. It has many great features and is very flexible to build games with and it lets you fine turn how messages are sent between players, creating sessions, synchronising shared data, VOIP, just to name a few. It is written in C++ but it has wrappers for most platforms, including C#.
Microsoft chose it for it’s Nasa experiences, and then later added Unity support in the Mixed Reality Toolkit – which is how we get to enjoy it. You can find the full source to it in the non-Unity3d Mixed Reality Toolkit. That is good if you want to add new features to the Sharing Service itself.
Architecturally you have the server running and clients connect into that server. They can join the same session as other users so they can communicate in that group. Any data “elements” created through the RakNet SDK will automatically be synchronised to all users in that session (if a player joins later, they will also automatically download all elements so that can get up to date). As I said above, Microsoft have added some specific features for creating rooms and anchors. That way clients can choose to enter a room and get the physical anchor for that space. It’s up to your app to decide what to do if the user is not in the same physical room, you can reposition the content somewhere in front of the user without the anchor so they can participate as well.
Connecting
To connect from Unity, all you need to do is add the Sharing prefab to your scene and set the IP address (here I replaced localhost with the IP address of my PC):
Oh yes, I know what you are thinking: “I don’t want to hard code my server address, why not just tick that Auto Discover Server checkbox?”. Unfortunately that feature seems to have been broken about 9 months ago, and there doesn’t seem to be any fix (or anyone in a hurry to fix it). The current recommendation is to load the IP address some other way, or build your own discovery capability.
Now that lets your HoloLens connect to the server and join a session with other users.
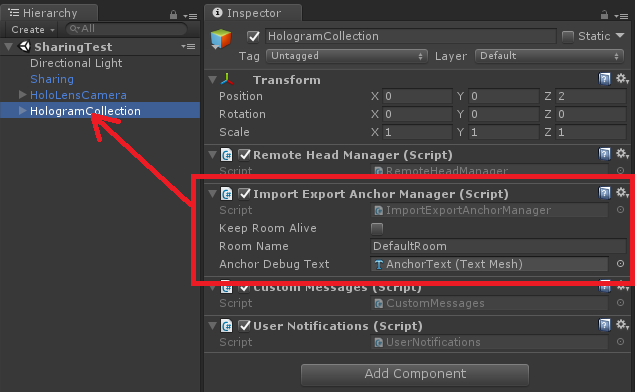
The next thing you want to do is establish a shared anchor. In the toolkit there is a script named ImportExportAnchorManager.
That will detect if a physical room is already registered on the sharing service, and if it has an anchor it will download and install the anchor (and apply the anchor to a gameobject). If no anchor is found, the script will make its own anchor, then save it in the anchor store so it can export it and upload it to the sharing service.
Spawning shared game objects
Strap yourself in, now it gets complicated – you want to synchronise the world-state between your players.
Actually, if you use the scripts provided it’s not that complicated once you can understand exactly what it going on.
I couldn’t find any decent documentation, but I was able to learn a lot looking through the other sharing test scene in Unity, which is called Spawn Sharing Test.
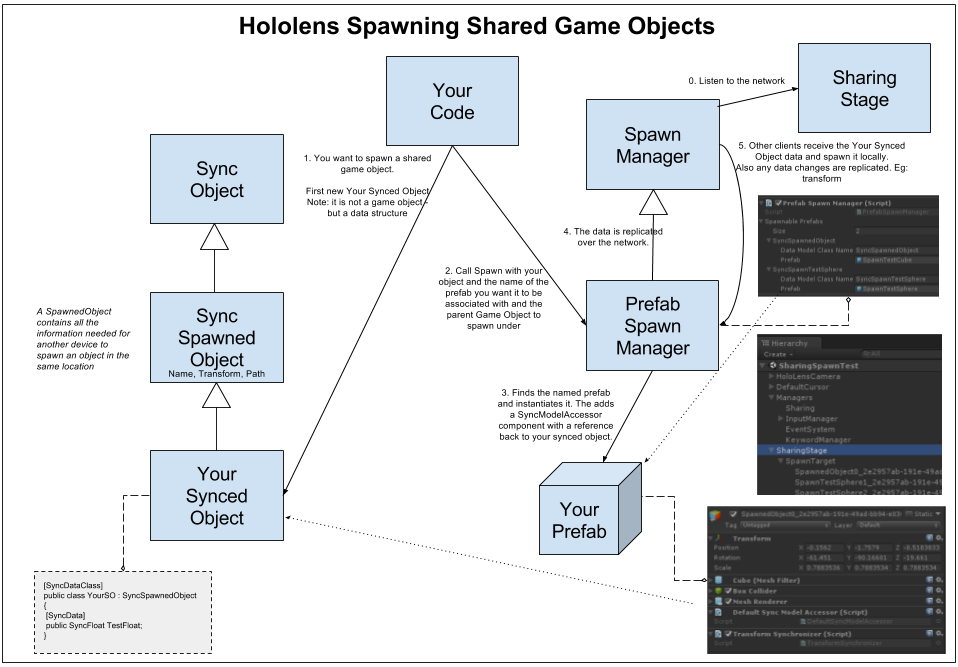
Basically you now have a magic friend the Prefab Spawn Manager. It will maintain a list of named prefabs that can be instantiated into the scene. If your code tells the Prefab Spawn Manager to instantiate one by name (and give it the transform details for where to spawn it), then the prefab manager will do 2 things:
1. Spawn the prefab locally
2. Use the network to save on the server those details, so all other players are notified of the name and location to also spawn the prefab.
Now there is one additional feature of the Prefab Spawn Manager – and that is you can associate your own custom data with that prefab that can also be repliacted on the network. To do this you create a data class derived from SyncSpawnedObject. You can use various data types to store data. Then when you ask the Prefab Spawn Manager to instantiate you a prefab you can also pass it your data class instance. The prefab manager will take care of also replicating that around the network.
Your scripts on the prefab can access your data object via the DefaultSyncModelAccessor component.
Wow – that all works and is pretty neat.
Sharing Service Review
So the sharing service is a good way to quickly get a multi-user experience running once you understand the above.
The downside is your users need to install and run the sharing service.
You could recompile it and run it on the cloud, but then you probably need some kind of user login system.
One downside is that this solution is quite complicated and it’s not well documented. So you can also look at Unity’s networking, which amongst other features enables you to run peer to peer by a user being assigned the job of server.
Any way, I hope this has been useful. Let me know any feedback !


October 24, 2017 at 1:35 am
Thank you for this article. From what I found this is the clearest piece of information on how the Sharing system works.